




especially in relation to children that may play with out-of-use appliances.
Children from 3 to 8 years of age are allowed to operate the on/off button ONLY, provided that the appliance is installed and ready for operation and such children have been supervised and instructed in safe operation of the appliance and they understand all related risks. Children from 3 to 8 years of age MUST NOT: connect the plug to power sockets, make adjustments, clean it or carry out user maintenance operations. This appliance can be used by children older than 8 years of age and by people with reduced physical, sensor and mental capabilities, as well as by people with insufficient experience and knowledge provided they are supervised or instructed in safe operation of the appliance and understand the related risks. Children should not be allowed to play with the appliance. Cleaning and user maintenance operations must not be carried out by children without supervision. • CAUTION: Some of the appliance parts may get very hot during operation and thus cause burns to users. In case there are children and vulnerable people in the room, special attention should be paid.
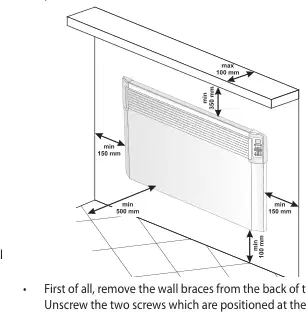
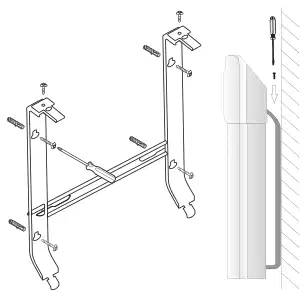
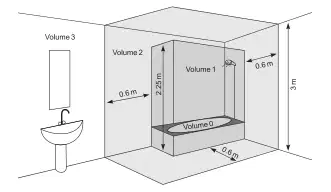
1. in places where a draught is present, which could influence the control settings; 2. right under a power socket; 3. in “Volume 1” for bathrooms; 4. in “Volume 2” if the control board can be reached by a person who is in a shower or in a bathtub; • for the wall-mounting of the panel heater, only the wall braces must be used which are delivered together with the appliance. When installing the panel heater, minimum safe distances must be observed
2 Operation and Storage Manual of Panel Heater

ELECTRONIC CONTROL
Temperature LED Time LED
“Heating” mode LED / Operating heater “Delayed start” mode LED / “Program” mode
“Timer” button for switching on “Delayed start” or “Program” mode “Open window” LED
“Protection from children” LED
Turn on the convector, press the switch in position “I” (On) .
The time setting is possible only in Off mode – the current day of the week, hour and minutes can be set.
To enter the time settings you need to keep simultaneously pressed the “ON/ OFF” and “Timer” buttons. The parameter which is being set blinks on the display. To select a parameter to set, you need to press briefly the “Timer” button. To exit the settings, you need to press briefly for a third time the “Timer” button (after you have set the minutes).
You begin the settings with selecting a day of the week from 1 to 7 depending on which in order the current day of the week is, and the setting is done by entering the respective number. The hour and the minutes are displayed simultaneously and the parameter which is being set is blinking. You can change the value of the parameter by using the and buttons.
If no button is presses for 10 seconds, you will exit the settings.
Switching on “Heating” mode
When the panel convector is switched off, the digital display shows the room temperature and only the Temperature LED is lit. If you press the “On/Off” button once, you will enable “Heating” mode. A red LED is lit indicating this mode. The digital display shows the set temperature for about 2 seconds, and during this time the Temperature LED is not lit. If the room temperature is lower than the set temperature, the heater will be automatically switched on.
When the heater is on the red LED is permanently lit!
By pressing either of the buttons and you will enter the “Change the set temperature” mode. The display starts flashing and it shows the temperature which has been set so far. By pressing the buttons you can change the temperature setting either up or down. If you don’t press any button for 5 seconds, the new setting will be stored and the appliance with automatically go into “Heating” mode. If you keep pressed any of the buttons or for more than 0.7 seconds, the value of the set temperature will start increasing or decreasing by 4 units per second. The temperature setting ranges from 10 to 30 degrees Celsius.
“Delayed start” of the panel convector
When the convector is in Off mode, by pressing the “Timer” button you can enter a specific time after which the appliance will automatically go in “Heating” mode. This mode is indicated by a blinking yellow LED and inactive red LED. The digital display will show the room temperature when the Temperature LED is lit, and it will show the remaining time in hours until “Heating” mode will be activated and this will be indicated with a lit Timer LED. Upon activating this mode the yellow LED becomes lit, and the display starts flashing and showing the entered time in hours until the convector will be automatically switched on. Initially the display will show 12 hours, and by using the or buttons you can adjust the desired time. If you keep pressed any of the buttons
Thank you for choosing CN04 panel heater. This is a product providing heating in winter depending on the consumers’ needs for comfortable room temperature. If operated and taken care of properly in accordance with these instructions, the appliance will provide you with many years of useful operation.
or for more than 0.7 seconds, the value of the set time will start increasing or decreasing by 4 units per second. If you don’t press any button for 5 seconds, or if you press the Timer button, the regulator will automatically go into “Delayed start” mode. If you enter time 00, this mode will not be activated. When the “Delayed start” mode is already active, if you press the “Timer” button again, you can correct the remaining time in both possible directions. After setting the time, the appliance goes into “Delayed start” mode with the display showing the temperature and the hours remaining until the appliance will switch to “Heating” mode. You can exit this mode by pressing the “On/Off” button.
Operation and Storage Manual of Panel Heater 3 English

Then the convector will go into “Heating” mode. The “Delayed start” mode can be set within a range from 01 to 96 hours.
the „ “ and “Timer” buttons for three seconds the display will show a blinking “A_On”. You need to press the „ “ button to reach „AOFF“; then you need to wait for 3 seconds and the function will be automatically stored.
Switching off “Heating” mode
You can exit “Heating” mode by pressing the “On/Off” button. Then the heater will be switched off, and if it has been on by then, the red LED will go out. The display will continue showing the room temperature.
“Anti-frost function” If the room temperature falls below 5 degrees Celsius and the convector is off (the red LED is not lit, but the mechanical switch is in position “I” (On) ), the heater will be automatically switched on in order to prevent from freezing.
This function can be set according to your needs. The appliance operates for 17 hours following the set “comfort” temperature until it reaches a stable status – this is the reference comfort temperature. Also, a temperature lower than the comfort one, with a difference from 4°C ± 1°С, has to be set for a period of minimum 7 hours. When the adaptive operation is enabled, leave the electronic thermoregulator of the appliance to operate for 4 cycles (4 х 24 hours) of comfort cycles (17 hours) and lowered temperature (7 hours). Upon completion of the last period of low temperature, the comfort temperature should be reached within ± 30 minutes deviation from the set time, with a maximum difference of ± 1°C from the reference comfort temperature.
Enabling and disabling the anti-frost function:
You can lock the buttons by continuously pressing the arrows and “Timer” buttons simultaneously, in order to prevent any changes to the settings. When this function is enabled you will see a lit green LED above the “padlock” icon. Repeat the same action to unlock the buttons.
“Temperature correction for the sensor” function
The appliance is equipped with an integrated electronic device which automatically switches off the heating power if a sharp decrease of temperature is found in the room, when a window or a door is open. When the temperature in the room begins increasing the heating will be automatically restored. To activate this function you need to press the “Window” button; a blinking green LED indicates that the function is enabled. Permanently lit green LED indicates that the appliance is not heating up. To disable the “Open window” function you need to press the “Window” button.
Due to the specifics of the temperature profile in some premises there may be difference from the temperature shown on the display and the actually measured temperature in the various locations of the heating appliance in the room.
Settings in „Weekly programmer 24/7”
To enter and exit the settings mode you need to continuously press the “Timer” button.
Note: This function is used with the purpose of providing better temperature comfort and energy saving for the user of the electric convector in the room which it is in. A temperature difference greater than ±4 °C from the measured temperature in a specific location in the room indicates that the room where you use the convector in is not well insulated or the temperature is not the same all around the room.
There are three parameters to be set – day of the week, time and temperature; switching among the three parameters is done by shortly pressing the “Timer” button in the following sequence: day, time, temperature. To store the settings, press shortly the “Timer” button after you finish the temperature setting.
You can change the value of each parameter by using the and buttons.
Example: a convector in a room on a stone floor – the convector displays 18°С (the set temperature is 22°С), the actually measured temperature (feeling of reached comfort temperature) is 22°С at a height of 60 cm from the floor - > in this case the convector continues to overheat the room (this is a direct energy loss, but the convector cannot reach the set temperature because it measures the temperature at a low height close to the floor) and it will never switch off. In this case a temperature correction of +4°С needs to be applied to the sensor, thus the convector will display 22°С and it will start switching off, and eventually it will maintain the set temperature of 22°С).
Conditions for settings storing
a. After a point has been stored, it cannot be changed any more until you exit the
current setting.
b. Upon storing the first set point of a specific day in the current setting, all
previously set points of the day are cleared.
c. Storing further points of a specific day is possible only for the hours remaining until the end of the day, after the last stored point.
d. When you have stored a point in the last hour of the day – 23.5h, you cannot
The normal status of the function is 0°C by default
store any more points for this day in the current setting, and the display will show “FUL” and the number of the day.
e. If nothing is stored in the current setting for a specific day, it will keep the existing stored points up to the current setting.
The purpose of the settings is to store the three parameters in the so called “SET POINTS”, where the temperature set for each set point is implemented until the next one is reached.
Example: If you have stored the temperature to be 22°C at 7 h and you wish the temperature to remain the same until 19 h (you plan the temperature to increase to 23°C then), you do not need store every single hour until 19 h, and you only need to store the temperature to be 23°C at 19 h. By default the temperature will be 22°C during this period of time (7 – 19 h).
The procedure for storing each point is as follows:
Upon entering settings mode the display will show dAY1, with the numeral blinking to indicate that this is the parameter to be set (in this case it is the day of the week).
a. to select the desired day, use the and buttons
4 Operation and Storage Manual of Panel Heater
“Protection from children” · “Open window” · Adaptive start

b. to go to time setting, shortly press the “Timer” button
c. use the and buttons to select the desired time (with a 0.5h interval) per point
d. to go to temperature setting, shortly press the “Timer” button
e. Two numerals (01÷96) and a blinking yellow LED indicate the remaining time in hours until the delayed start, if the appliance has been in “Delayed start” mode before disconnecting it from the power supply.
e. to select the desired temperature, use the and buttons. The possible temperature range is from 10 to 30°С, and OFF status is possible as well.
f. To store the point, shortly press the “Timer” button; then you are automatically transferred to the setting of the next point (the display again shows dAYX) and you can proceed with paragraph а) for the next point.
f. With the purpose of further energy saving, the electronic thermoregulator reduces the brightness of illumination of all LEDs. Upon pressing any of the buttons the brightness increases for 8 seconds and it is then reduced again.
g. When you have stored a point in the last hour of the day – 23.5h, you cannot
g. If the display shows “t1” or “t2“, this means that the self-diagnostic system has
store any more points for this day in the current setting, and the display will show “FUL_” and the number of the day.
found a problem with the temperature sensor. “t1” indicates a disconnected cable at the sensor, while “t2” indicates short circuit at the sensor. In this case the electric convector will be automatically switched off and it can be switched on again only after the problem has been fixed. The problem has to be handled by a qualified specialist.
h. Upon switching on the power supply the display will show hyphens “ “ for 2
seconds instead of temperature of time.
i. When the digital display shows the temperature the “Temperature” LED is lit, and when it shows the time, the “Timer” LED is lit.
Adding more points in a particular day may be done at random, after you have stored points for other days, however you need to observe the rule for ascending order of their times in a day.
To exit the settings mode, press continuously the “Timer” button and wait for 30 seconds.
Upon leaving the settings you can review the stored points by using the and buttons, provided that the appliance is in programming mode.
“Return to factory settings” function
When the convector is in “Off” mode, press the and buttons simultaneously for six seconds; then the display will show „ “ and rotating symbols. When it is “reset”, the display will show the measured value of the room temperature.
After using the reset function, you need to re-enter the settings of the following functions:
If the electric convector is disconnected from the mains, this will not affect the set temperature and the mode of operation which has been active prior to its disconnection. If for example the convector has been in “Heating” mode, after it has been disconnected and reconnected to the mains, it will continue operating in the same mode with the same set temperature.
When the room temperature is lower than the temperature set by the electronic thermoregulator, the convector will start operating and will continue operating until the room temperature reaches the set value. When the room temperature is higher than the temperature set by the electronic thermoregulator, the convector will automatically go into “Standby” mode.
Information presented on panel heater display
Indications when you are not in settings mode:
a. In Off mode – consecutively showing:
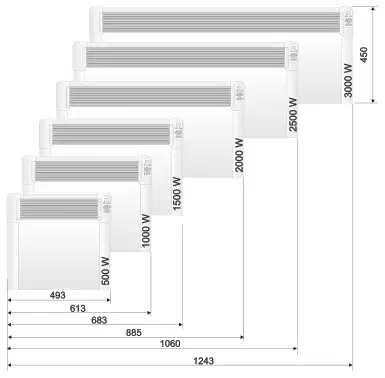
DIMENSIONS OF HEATED VOLUME AND HEATED AREA OF A ROOM / APPLIANCE MODELS
b. In Heating mode – it shows the measured room temperature
c. In Programming mode – consecutively showing:
d. Upon connecting the convector to power supply the display shows:
* Minimum guaranteed heated volume (area) for heating at an average capacity of heat transmission factor λ=0.5 W/(m2K) for a heated room. Higher values of heated volume (area) can be achieved at an average value of λ=0.35 W/ (m2K). Standard height of heated rooms – 2.5 meters.
Operation and Storage Manual of Panel Heater 5 English

Obsolete electric appliances contain valuable materials and consequently they should not be treated as domestic waste! We ask for your cooperation and your active contribution to protect the resources and the environment. Please submit your out-of-use appliances to the organized buy-back stations (if there are such).
Model identifier(s): 1.CN04 050 EIS W; 2.CN04 100 EIS W; 3.CN04 150 EIS W; 4.CN04 200 EIS W; 5.CN04 250 EIS W; 6.CN04 300 EIS W 230V~ 50Hz
With black bulb sensor [no]
48 Madara Blvd, Shumen, 9700, Bulgaria
6 Operation and Storage Manual of Panel Heater
Environment protection instructions · TESY Ltd

Prior to contacting the Customer Service Center, please check the items in the table below.
Operation and Storage Manual of Panel Heater 7 English
In dieser Anleitung genannte Seiten – Hersteller, Support und Downloads.
Häufige Probleme, wahrscheinliche Ursachen und Lösungen.
| Problem | Mögliche Ursache | Abhilfe | |
|---|---|---|---|
| The appliance doesn‘t work | No power supply from the grid. Plug into the power outlet and check position of the ON/OFF Be sure that the product is plugged in and that the electrical switch. outlet is working. | p.6 | |
| The appliance doesn‘t work | The temperature may be set too low. | Set the temperature to a higher position. | p.6 |
| The appliance doesn‘t work | The “Protection from children” may be activated. See the section “Protection from children” in the user manual. | p.6 | |
| The appliance doesn‘t work | The delayed start is working. | Press the Turn ON button from control board. | p.6 |
| Room does not get warm enough although the appliance is hot | Appliance overheating. High limit safety cut-out limits heating Eliminate the cause (cover, dirt or obstructions at the air inlet or output. outlet).Observe minimum clearances according to mounting instructions. | p.6 | |
| Room does not get warm enough although the appliance is hot | Check the Temperature correction for the sensor | See the temperature shown on the display of the appliance. Measure the temperature at a place where the temperature is “comfortable” enough for you. If you fnid a difefrence within a range of ±4°С, you can set the necessary correction in the convector’s menu by entering the temperature difefrence resulting between the value on the display and the actually measured temperature. | p.6 |
| Room does not get warm enough although the appliance is hot | The heat demand of the room is higher than the appliance Remove heat losses (Close windows and doors. Avoid constant output. venting.) | p.6 | |
| Room does not get warm enough although the appliance is hot | Check if the power of your device is adapted to the size of your room. | Recommended an average of 100 W/m2 for a ceiling height of 2,50m or 30W/m3 | p.6 |
| Open window/door detection does not respond | Appliance does not detect a pronounced temperature drop due Avoid obstructions that may prevent normal air exchange to venting. (Open window/door detection requires previously between the appliance and the indoor air. stable room temperature.) | p.6 | |
| Open window/door detection does not respond | Open window/door detection is not enabled | Switch on open window/door detection. | p.6 |
| „Adaptive start“ function does not work as required | This function works only in weekly mode. Switch on Adaptive start function. | p.6 | |
| „Adaptive start“ function does not work as required | Severely fulctuating room temperature or the appliance learning procedure has not been completed. | Wait a few days for behavior to stabilize. | p.6 |
| „Adaptive start“ function does not work as required | “Adaptive start” function is not enabled. Switch on the „Adaptive start“ function in the menu. | p.6 | |
| Display shows “t1” or “t2“ | The self-diagnostic system has found a problem with the temperature sensor “t1” indicates a disconnected cable at the sensor “t2” indicates short circuit at the sensor | In this case the electric convector will be automatically switched of fand it can be switched on again only after the problem has been fxied by the authorized service representatives. Contact the authorized service center or the retailer you bought the product from. | p.6 |
| Dirty marks appear on the wall around the device | The dirty marks come as a result of air contamination. Make sure that some fresh air enters the room regularly, especially if it is used for smoking. | p.6 | |
| The device does not follow internal programming commands | The date and time are not set correctly. | Check the set date and time. | p.6 |
| The device does not follow internal programming commands | The appliance is under Open window/door detection. Switch of fthe Open window/door detection. | p.6 | |
| Sounds/Noises | Emitting faint noises during the heating process and shortly after the set temperature is reached, is not something unusual. | Such efefct is in result of the natural materials expansions during the rapid temperature increase and following cooling of the metals used for the product manufacturing. | p.6 |
| Yellowish stains on the grid | Such stains could be in result of covering the product with wet Do not cover the product! Such actions are not allowed, because clothes. they block the air convection and will damage the product irreparably, leading to serious risk for your health and properties. | p.6 |
Besitzer und unser Team antworten in der Regel innerhalb eines Tages – und Ihre Frage hilft auch anderen weiter.
Stellen Sie die erste Frage — andere Nutzer oder unser Team antworten Ihnen.