
DE
Novy logo
Offizielle Bedienungsanleitung

Novy 7510

28 Seiten·317 KB·Dunstabzugshaube·PDF·ENITJA
Novy 7510
Inhaltsverzeichnis 1 Abschnitte GENERAL INFORMATION AnzeigenAusblenden
Page 1 of the Novy 7510 user manual — GENERAL INFORMATION
Seite 1 · Zum Vergrößern klicken
Seite 1

GENERAL INFORMATION

  • Please read these operating instructions carefully. They contain information about installation, operation, safety and maintenance you need to be aware of.
  • This hood is for domestic use only
  • It is recommended to have the installation done by a qualified professional. Any damage due to faulty or unprofessional installation relieves the manufacturer of any form of responsibility.
  • Check the condition of the hood and the installation material before installing. Carefully remove the hood out of the packaging. Be careful not to use sharp knives to open the box.
  • Please keep these instructions to pass on to future users.
  • Disposal of transport packaging and old appliance Your new appliance was sent to you in protective packaging. All utilised materials are environmentally safe and recyclable. Please help us by disposing of the packaging in an environmentally friendly manner. Old appliances are not worthless rubbish. Valuable raw materials can be reclaimed by recycling old appliances. This appliance is identified according to the European Directive 2002/96/EC on waste electrical and electronic equipment. Please ask your dealer or inquire at your local authority about current means of disposal.
  • Technical problem In case of technical problems please contact Novy Service Department: For Belgium: Tel.: 056/36.51.02 For France: Tel.: 03.20.94.06.62 For Germany: Tel.: 0511.54.20.771 For all other countries: your local installor or Novy Belgium: +32 (0)56/36.51.02 Please supply us with the model number of your hood. The model number can be found on the engraved plaque behind the filter. You can make a note of the number here: ……………………………
  • For all remarks or questions to which this manual doesn’t answer please contact our Customer Service: For Belgium: Tel.: 056/36.51.01 For France: Tel.: 03.20.94.06.62 For Germany: Tel.: 0511.54.20.771 For all other countrys: your local installor or Novy Belgium: +32 (0)56/36.51.02
Page 2 of the Novy 7510 user manual — GENERAL INFORMATION
Seite 2 · Zum Vergrößern klicken
Seite 2
Novy 7510 — GENERAL INFORMATION diagram (page 2)
Abb. 1
  • Safety
  • Deep frying under the hood is only allowed under constant supervision.
  • Under no circumstances is it allowed to flambé under the hood.
  • In case of fire always switch off the hood.
  • Never extinguish burning fat or oil with water. Cover the pot with a well fitting lid or a burnblanket.

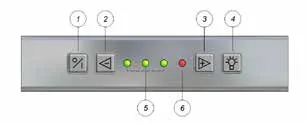
① switch on / off ② decrease speed levels ⑤ and ⑥ speed indicator lamps ③ increase speed levels ④ illumination

Switch on - switch off To switch the motor on push button ①. The hood will always resume the level it was previously switched off in.

  • Advice For maximum efficiency please follow this advice:
  • When cooking make sure pots are positioned properly under the hood surface.
  • Activate the hood a few minutes prior to cooking.
  • Switch the hood off 10 minutes after cooking is finished (use delay function when present).
  • Avoid drafts under the hood surface.
  • When using induction: adapt the intensity of both hob and hood to the lowest possible level in order to avoid excessive creation of damp fumes.

Switch off with 10 minute delay: Press button ① once. The first green speed indicator lamp blinks, the other speed indicator lamp s remain lit up according to the level in use. After 10 minutes motor and illumination switch off automatically.

Switch off without delay: Push button ① twice.

Auto-Stop To avoid that the hood will function during a too long period, it will switch off automatically after 3 hours (when no changes to the controls have been made). Only the motor will turn off automatically. The lighting and ambient lighting will stay on.

Levels of intensity To decrease speed levels push button ②. To increase speed levels push button ③. Three green LED’s ⑤ indicate level 1 to 3, one red LED ⑥ indicates the level ‘POWER’.

‘POWER’ is only used in case of excessive formation of smoke, fumes or odours. Taking into account the large volume of air which is extracted from the room at this level, it’s use should be limited.

‘POWER’ automatically reverts to level 3 after 6 minutes.

Lighting Press key ④ to switch the lighting on or off. The LED lighting has a soft on/soft off mode, which means that the lighting will evenly go on and off. When switching on the lighting, this will always light up with full power and it can also be used when the fan is off.

Use · Operation

Page 3 of the Novy 7510 user manual — GENERAL INFORMATION
Seite 3 · Zum Vergrößern klicken
Seite 3

Dimming LED lighting: When the LED lighting has been switched on, it can be dimmed by keeping key ④ pressed.

Ambient lighting Press the on/off button for 3 seconds and the ambiant lighting will start.

1 2 3 4 5

Programming the remote control

The remote control for hood and hob are pre- installed and ready for use. Only when te remote control needs to be reprogrammed (interaction with other controls)act as in the following.

Maintenance of the grease filter The hood contains one metal filter which should be cleaned twice a month.

Grease filter indication After 20 cooking hours, the 4 LEDs will start to blink during 5 minutes, this indicates that the grease filter has to be cleaned. When replacing the cleaned filter, you have to reset the hood by pushing the – button during 5 seconds . If you don’t reset, the LED lights will continu blinking.We advise you to clean your filter twice a month for an optimal operation.

Determine the code useda. Simultaneously press

the key . The lamp flashes as well as the selected code (there are 10 code options in total) (figure 1).

Change the codea. Simultaneously press

the key for 3 seconds until the lamp is flashing. After this the lamp as well as the selected code will flash. Repeat this step until you have reached the required code (there are 10 code options in total) (figure 1). b. Simultaneously press

Access to the filter Take hold of the right and left side of the plate (a) and pull down simultaneously. Remove the filter (b) by taking hold of its hook and pulling down.

until the second green speed indicator lamp is blinking (figure 2). c. Press the

key on the remote control within 10 seconds to confirm the settings. The cooker hood and the remote control are now in line with each other (figure 3).

Novy 7510 — GENERAL INFORMATION diagram (page 3)
Abb. 2
  • Change the batteries:
  • For changing the batteries unscrew the plastic cover, remove the old batteries and insert the new ones. Pay attention to the polarity marking given in the battery compartment (figure 4).
  • Empty batteries are not to be disposed of in the household refuse, but they are to be handed in as chemical waste.
  • Cleaning the filter:
  • in the dishwasher
  • manually: in a hot solution of water and a liquid detergent. Rinse and allow to dry completely

NOVY key: • You can switch on the ambient lighting using the NOVY key (figure 5).

Technical information: - Power supply: (2xAAA) batteries - Frequence: 433.92Mhz - Numbre of codes: 10 - Worktemperature: 0-50°C - Dimensions: 110 x 50 x 19mm

Maintenance of the recirculation filter The cooker hood has a Monoblock recirculation filter. Only use the Novy Monoblock recirculation filter in the cooker hood.

Cleaning indication: The red LED will light up after 200 working hours (time to regenerate the Monoblock recirculation filter). The recirculation filter is to be found behind the grease filter.

Show 4 more labels / short text on this page
Maintenance · on/off + · on/off + · +
Page 4 of the Novy 7510 user manual — GENERAL INFORMATION
Seite 4 · Zum Vergrößern klicken
Seite 4
  • Remove the Monoblock recirculation filter:
  • Open the bottom plate with both hands and remove the aluminium grease filter from the hood.
  • The Monoblock recirculation filter is found in its opening in the cooker hood. Remove it from the cooker hood.

Please allow the lights to cool down sufficiently before touching them. Cover and protect delicate surfaces underneath the hood when changing lamps. The hood needs to be disconnected from the current before proceeding.

  • Regenerate the Monoblock recirculation filter:
  • The Monoblock can be regenerated up to 12 times. This is done in the oven.
  • Place the filter in the oven for 1 hour at 120°C. Provide sufficient fresh air in the room where the oven has been placed, as smells can be released. Smells can be released when baking certain kinds of fish. The best solution for this is to immediately regenerate the filter.
1. Carefully slide down the spotlight holder and then open the spotlight holder with a tilting movement.
Novy 7510 — GENERAL INFORMATION diagram (page 4)
Abb. 3

Reset the Monoblock recirculation filter The cooker hood (motor) must be running! Simultaneously press + and – for 5 sec. until the red indicator lamp flashes 3 times for confirmation.

  • Place the Monoblock recirculation filter:
  • Open the bottom plate with both hands and remove the aluminium grease filter from the hood.
  • Place the Monoblock recirculation filter is its opening in the cooker hood.
  • Put back the aluminium grease filter and close the bottom plate.
2. Removing the LED lamp: A. First disconnect the cable to the LED to be

replaced. Disconnect by means of releasing the lock, by applying light pressure while at the same time pulling away. B. Next, remove the LED to be replaced by

making a gentle rotating movement to the left.

Novy 7510 — GENERAL INFORMATION diagram (page 4)
Abb. 4

Deactivate the programming: Attention! This is not recommended for a cooker hood with recirculation. Simultaneously press + and – for 5 sec. until the third green LED flashes 3 times.

Maintenance of the bottom side of the cooker hood Please allow the lights to cool down sufficiently before cleaning the hood. Use a soft, wet cloth and a mild detergent to clean the hood. Never use aggressive, abrasive detergents or sponges. Bleach will damage stainless steel. The stainless steel surfaces can be treated with Novy Inoxcleaner (906.060) after cleaning.

3. Mounting the new LED: A. Place the new LED light into the locking ring. B. Make a rotating movement to the right until

the LED light is locked. C. Connect the power cable. D. Put back the cover at its place.

Novy 7510 — GENERAL INFORMATION diagram (page 4)
Abb. 5

Maintenance of the Solid Surface material The housing is made from Solid Surface. Cleaning is done using a cloth or sponge moistened with a mild detergent. Then rub dry with a dry, soft cloth to avoid stains. Do not use an abrasive or scourer.

Replacing the lamps

Page 5 of the Novy 7510 user manual — GENERAL INFORMATION
Seite 5 · Zum Vergrößern klicken
Seite 5

Lamps of the ambient lighting

Unscrew the screws on top of the structure

Electrical output: electrical cord. Changes or replacement of the electrical cord should be performed by a professional only.

Novy 7510 — GENERAL INFORMATION diagram (page 5)
Abb. 6
Dimensionsp. 22 Electrical scheme: p. 23

Use the suction device to open the covers

Novy 7510 — GENERAL INFORMATION diagram (page 5)
Abb. 7

Turn the lamp a quarter (1). Push it to the front, until it comes out of the holder. (2). Pull the lamp to the top.(3)

Novy 7510 — GENERAL INFORMATION diagram (page 5)
Abb. 8

The atmospheric lighting contains four lamps. When changing the lamps, we advise you to order the new lamps with Novy in order to avoid difference in colour.

Electrical connection

Page 6 of the Novy 7510 user manual — GENERAL INFORMATION
Seite 6 · Zum Vergrößern klicken
Seite 6

Afmetingen - Dimensions - Abmessungen - Dimensions

Novy 7510 — GENERAL INFORMATION diagram (page 6)
Abb. 9

7510 - 7520

Page 7 of the Novy 7510 user manual — GENERAL INFORMATION
Seite 7 · Zum Vergrößern klicken
Seite 7

Elektrisch schema - Schéma électrique - Elektrischer Schaltplan - Electrical scheme

Novy 7510 — GENERAL INFORMATION diagram (page 7)
Abb. 10

7510 - 7520

Page 8 of the Novy 7510 user manual — GENERAL INFORMATION
Seite 8 · Zum Vergrößern klicken
Seite 8
Page 8 of the Novy 7510 user manual — GENERAL INFORMATION
Page 9 of the Novy 7510 user manual — GENERAL INFORMATION
Seite 9 · Zum Vergrößern klicken
Seite 9
Page 9 of the Novy 7510 user manual — GENERAL INFORMATION

Frage zu Novy 7510 stellen

Besitzer und unser Team antworten in der Regel innerhalb eines Tages – und Ihre Frage hilft auch anderen weiter.

Add your email to get notified when it’s answered — no spam, ever.

0 questions
Noch keine Fragen zu Novy 7510

Stellen Sie die erste Frage — andere Nutzer oder unser Team antworten Ihnen.

Originaldokument

Novy 7510 PDF-Anleitung

28 Seiten·317 KB·Dunstabzugshaube·PDF
Klicken Sie oben auf eine Seite, um sie hier zu öffnen
Seite 1 / …
100%
Seiten werden geladen…