




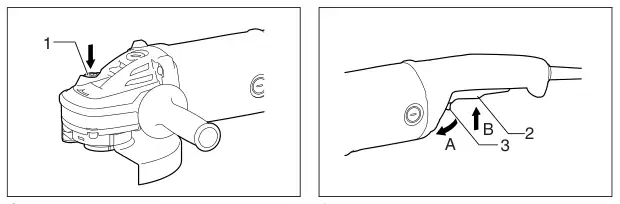
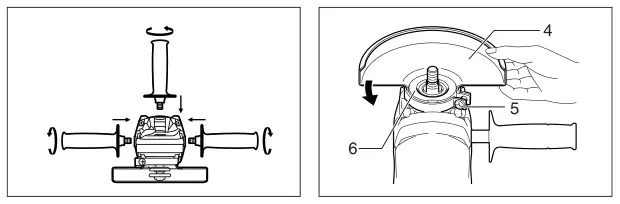
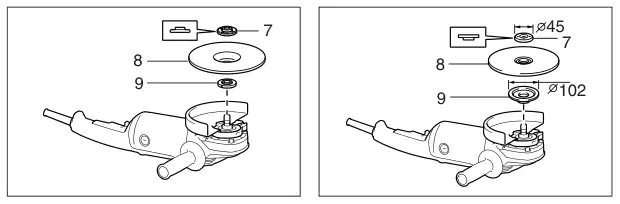
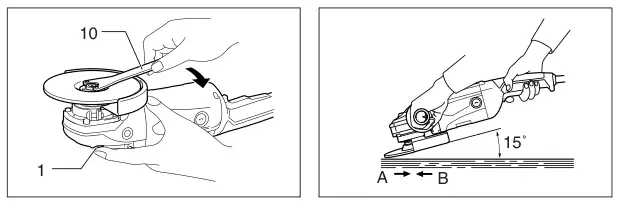

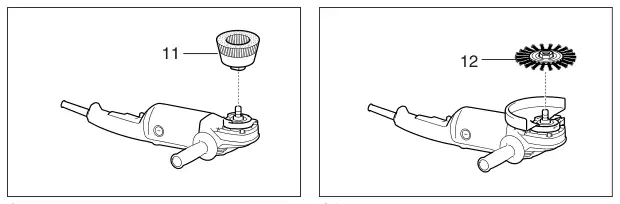


1 Shaft lock 2 Switch trigger 3 Lock lever 4 Wheel guard 5 Screw 6 Bearing box 7 Lock nut 8 Depressed center grinding wheel
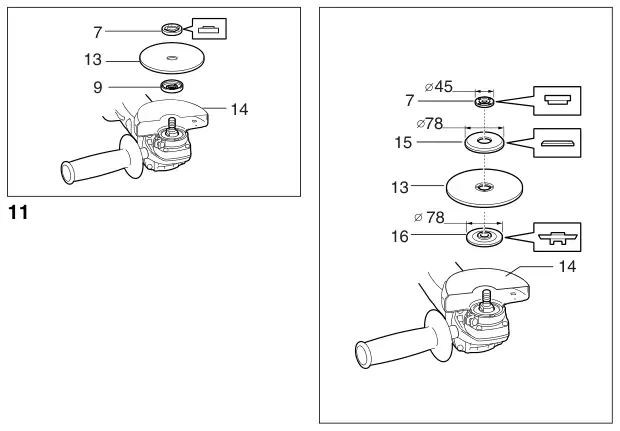
9 Inner flange 10 Lock nut wrench 11 Wire cup brush 12 Wire wheel brush 13 Abrasive cut-off wheel/diamond wheel 14 Wheel guard for abrasive cut-off wheel/diamond wheel 15 Outer flange 78
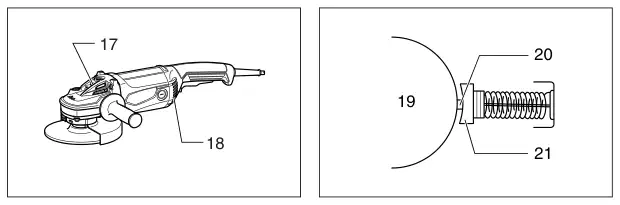
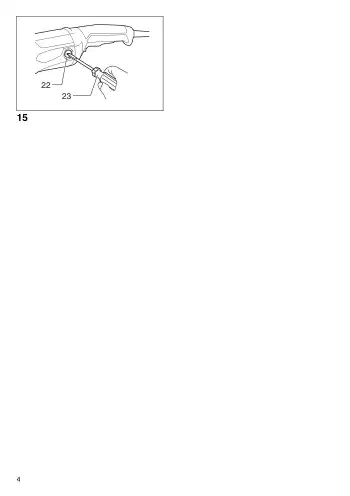
16 Inner flange 78 17 Exhaust vent 18 Inhalation vent 19 Commutator 20 Insulating tip 21 Carbon brush 22 Brush holder cap 23 Screwdriver
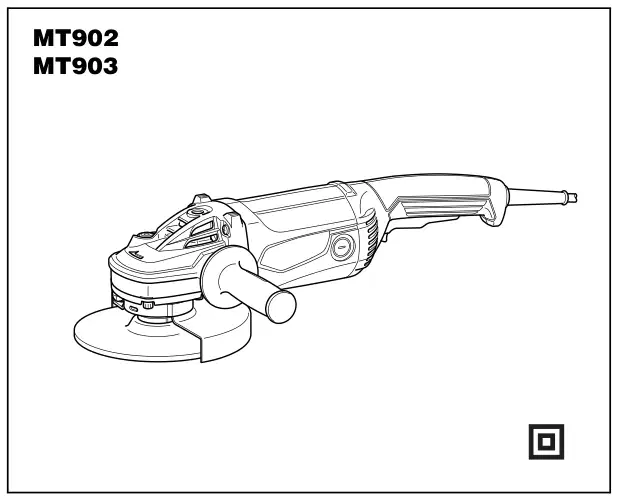
SPECIFICATIONS Model MT902 MT903 Depressed center wheel diameter 180 mm 230 mm Spindle thread M14 M14 Rated speed (n) / No load speed (n0) 8,500 min-1 6,600 min-1
Overall length 466 mm 466 mm Net weight 5.4 kg 5.7 kg Safety class /II /II
Safety Warnings Common for Grinding, Sanding, Wire Brushing, or Abrasive Cutting-Off Operations: 1. This power tool is intended to function as a grinder, sander, wire brush or cut-off tool. Read all safety warnings, instructions, illustrations and specifications provided with this power tool. Failure to follow all instructions listed below may result in electric shock, fire and/or serious injury. 2. Operations such as polishing are not recom- mended to be performed with this power tool. Operations for which the power tool was not designed may create a hazard and cause personal injury. 3. Do not use accessories which are not specifi- cally designed and recommended by the tool manufacturer. Just because the accessory can be attached to your power tool, it does not assure safe operation. 4. The rated speed of the accessory must be at least equal to the maximum speed marked on the power tool. Accessories running faster than their rated speed can break and fly apart. 5. The outside diameter and the thickness of your accessory must be within the capacity rating of your power tool. Incorrectly sized accessories can- not be adequately guarded or controlled. 6. The arbour size of wheels, flanges, backing pads or any other accessory must properly fit the spindle of the power tool. Accessories with arbour holes that do not match the mounting hardware of the power tool will run out of balance, vibrate exces- sively and may cause loss of control.
ENF002-1 Power supply The tool should be connected only to a power supply of the same voltage as indicated on the nameplate, and can only be operated on single-phase AC supply. They are double-insulated in accordance with European Standard and can, therefore, also be used from sockets without earth wire.
ENF100-1 For public low-voltage distribution systems of between 220 V and 250 V. Switching operations of electric apparatus cause voltage fluctuations. The operation of this device under unfavor- able mains conditions can have adverse effects to the operation of other equipment. With a mains impedance equal or less than 0.24 Ohms it can be presumed that there will be no negative effects. The mains socket used for this device must be protected with a fuse or protective circuit breaker having slow tripping characteristics.
GEA010-1 General Power Tool Safety Warnings
Save all warnings and instructions for future refer- ence.

7. Do not use a damaged accessory. Before each use inspect the accessory such as abrasive wheels for chips and cracks, backing pad for cracks, tear or excess wear, wire brush for loose or cracked wires. If power tool or accessory is dropped, inspect for damage or install an undamaged accessory. After inspecting and installing an accessory, position yourself and bystanders away from the plane of the rotating accessory and run the power tool at maximum no-load speed for one minute. Damaged accesso- ries will normally break apart during this test time. 8. Wear personal protective equipment. Depending on application, use face shield, safety goggles or safety glasses. As appropriate, wear dust mask, hearing protectors, gloves and workshop apron capable of stopping small abrasive or workpiece fragments. The eye protection must be capable of stopping flying debris generated by vari- ous operations. The dust mask or respirator must be capable of filtrating particles generated by your oper- ation. Prolonged exposure to high intensity noise may cause hearing loss. 9. Keep bystanders a safe distance away from work area. Anyone entering the work area must wear personal protective equipment. Fragments of workpiece or of a broken accessory may fly away and cause injury beyond immediate area of opera- tion. 10. Hold power tool by insulated gripping surfaces only, when performing an operation where the cutting accessory may contact hidden wiring or its own cord. Cutting accessory contacting a “live” wire may make exposed metal parts of the power tool “live” and shock the operator. 11. Position the cord clear of the spinning acces- sory. If you lose control, the cord may be cut or snagged and your hand or arm may be pulled into the spinning accessory. 12. Never lay the power tool down until the acces- sory has come to a complete stop. The spinning accessory may grab the surface and pull the power tool out of your control. 13. Do not run the power tool while carrying it at your side. Accidental contact with the spinning accessory could snag your clothing, pulling the accessory into your body. 14. Regularly clean the power tool’s air vents. The motor’s fan will draw the dust inside the housing and excessive accumulation of powdered metal may cause electrical hazards. 15. Do not operate the power tool near flammable materials. Sparks could ignite these materials. 16. Do not use accessories that require liquid cool- ants. Using water or other liquid coolants may result in electrocution or shock.
Kickback and Related Warnings Kickback is a sudden reaction to a pinched or snagged rotating wheel, backing pad, brush or any other acces- sory. Pinching or snagging causes rapid stalling of the rotating accessory which in turn causes the uncontrolled power tool to be forced in the direction opposite of the accessory’s rotation at the point of the binding. For example, if an abrasive wheel is snagged or pinched by the workpiece, the edge of the wheel that is entering into the pinch point can dig into the surface of the mate- rial causing the wheel to climb out or kick out. The wheel may either jump toward or away from the operator, depending on direction of the wheel’s movement at the point of pinching. Abrasive wheels may also break under these conditions. Kickback is the result of power tool misuse and/or incor- rect operating procedures or conditions and can be avoided by taking proper precautions as given below.
a) Maintain a firm grip on the power tool and
position your body and arm to allow you to resist kickback forces. Always use auxiliary handle, if provided, for maximum control over kickback or torque reaction during start- up. The operator can control torque reactions or kickback forces, if proper precautions are taken. b) Never place your hand near the rotating
accessory. Accessory may kickback over your hand. c) Do not position your body in the area where
power tool will move if kickback occurs. Kick- back will propel the tool in direction opposite to the wheel’s movement at the point of snagging. d) Use special care when working corners,
sharp edges etc. Avoid bouncing and snag- ging the accessory. Corners, sharp edges or bouncing have a tendency to snag the rotating accessory and cause loss of control or kickback. e) Do not attach a saw chain woodcarving blade
or toothed saw blade. Such blades create fre- quent kickback and loss of control.
Safety Warnings Specific for Grinding and Abrasive Cutting-Off Operations:
a) Use only wheel types that are recommended
for your power tool and the specific guard designed for the selected wheel. Wheels for which the power tool was not designed cannot be adequately guarded and are unsafe. b) The guard must be securely attached to the
power tool and positioned for maximum safety, so the least amount of wheel is exposed towards the operator. The guard helps to protect operator from broken wheel frag- ments and accidental contact with wheel. c) Wheels must be used only for recommended
applications. For example: do not grind with the side of cut-off wheel. Abrasive cut-off wheels are intended for peripheral grinding, side forces applied to these wheels may cause them to shatter. d) Always use undamaged wheel flanges that
are of correct size and shape for your selected wheel. Proper wheel flanges support the wheel thus reducing the possibility of wheel breakage. Flanges for cut-off wheels may be dif- ferent from grinding wheel flanges.

e) Do not use worn down wheels from larger
Additional safety warnings: 17. When using depressed center grinding wheels, be sure to use only fiberglass-reinforced wheels. 18. Be careful not to damage the spindle, the flange (especially the installing surface) or the lock nut. Damage to these parts could result in wheel breakage. 19. Make sure the wheel is not contacting the work- piece before the switch is turned on. 20. Before using the tool on an actual workpiece, let it run for a while. Watch for vibration or wobbling that could indicate poor installation or a poorly balanced wheel. 21. Use the specified surface of the wheel to per- form the grinding. 22. Watch out for flying sparks. Hold the tool so that sparks fly away from you and other persons or flammable materials. 23. Do not leave the tool running. Operate the tool only when hand-held. 24. Do not touch the workpiece immediately after operation; it may be extremely hot and could burn your skin. 25. Always be sure that the tool is switched off and unplugged or that the battery cartridge is removed before carrying out any work on the tool. 26. Observe the instructions of the manufacturer for correct mounting and use of wheels. Handle and store wheels with care. 27. Do not use separate reducing bushings or adap- tors to adapt large hole abrasive wheels. 28. Use only flanges specified for this tool. 29. For tools intended to be fitted with threaded hole wheel, ensure that the thread in the wheel is long enough to accept the spindle length. 30. Check that the workpiece is properly supported. 31. Pay attention that the wheel continues to rotate after the tool is switched off. 32. If working place is extremely hot and humid, or badly polluted by conductive dust, use a short- circuit breaker (30 mA) to assure operator safety. 33. Do not use the tool on any materials containing asbestos. 34. Do not use water or grinding lubricant. 35. Ensure that ventilation openings are kept clear when working in dusty conditions. If it should become necessary to clear dust, first disconnect the tool from the mains supply (use non metallic objects) and avoid damaging internal parts. 36. When use cut-off wheel, always work with the dust collecting wheel guard required by domes- tic regulation. 37. Cutting discs must not be subjected to any lat- eral pressure.
power tools. Wheel intended for larger power tool is not suitable for the higher speed of a smaller tool and may burst.
Additional Safety Warnings Specific for Abrasive Cutting-Off Operations:
a) Do not “jam” the cut-off wheel or apply
excessive pressure. Do not attempt to make an excessive depth of cut. Overstressing the wheel increases the loading and susceptibility to twisting or binding of the wheel in the cut and the possibility of kickback or wheel breakage. b) Do not position your body in line with and
behind the rotating wheel. When the wheel, at the point of operation, is moving away from your body, the possible kickback may propel the spin- ning wheel and the power tool directly at you. c) When wheel is binding or when interrupting a
cut for any reason, switch off the power tool and hold the power tool motionless until the wheel comes to a complete stop. Never attempt to remove the cut-off wheel from the cut while the wheel is in motion otherwise kickback may occur. Investigate and take cor- rective action to eliminate the cause of wheel binding. d) Do not restart the cutting operation in the
workpiece. Let the wheel reach full speed and carefully reenter the cut. The wheel may bind, walk up or kickback if the power tool is restarted in the workpiece. e) Support panels or any oversized workpiece
to minimize the risk of wheel pinching and kickback. Large workpieces tend to sag under their own weight. Supports must be placed under the workpiece near the line of cut and near the edge of the workpiece on both sides of the wheel. f) Use extra caution when making a “pocket
cut” into existing walls or other blind areas. The protruding wheel may cut gas or water pipes, electrical wiring or objects that can cause kickback.
Safety Warnings Specific for Sanding Operations:
a) Do not use excessively oversized sanding
disc paper. Follow manufacturers recommen- dations, when selecting sanding paper. Larger sanding paper extending beyond the sanding pad presents a laceration hazard and may cause snagging, tearing of the disc or kick- back.
Safety Warnings Specific for Wire Brushing Opera- tions:
a) Be aware that wire bristles are thrown by the
SAVE THESE INSTRUCTIONS.
brush even during ordinary operation. Do not overstress the wires by applying excessive load to the brush. The wire bristles can easily penetrate light clothing and/or skin. b) If the use of a guard is recommended for wire
brushing, do not allow interference of the wire wheel or brush with the guard. Wire wheel or brush may expand in diameter due to work load and centrifugal forces.

Installing or removing wheel guard (For depressed center wheel, multi disc, wire wheel brush / abrasive cut-off wheel, diamond wheel)
Press the shaft lock to prevent spindle rotation when installing or removing accessories.
Mount the wheel guard with the protrusion on the wheel guard band aligned with the notch on the bearing box. Then rotate the wheel guard around 180 degrees coun- terclockwise. Be sure to tighten the screw securely. To remove wheel guard, follow the installation procedure in reverse. (Fig. 4)
Installing or removing depressed center grinding wheel/Multi-disc (accessory) Mount the inner flange onto the spindle. Fit the wheel/ disc on the inner flange and screw the lock nut onto the spindle. (Fig. 5)
For tool with the lock-on switch To start the tool, simply pull the switch trigger (in the B direction). Release the switch trigger to stop. For continu- ous operation, pull the switch trigger (in the B direction) and then push in the lock lever (in the A direction). To stop the tool from the locked position, pull the switch trig- ger fully (in the B direction), then release it.
For tool with the lock-off switch To prevent the switch trigger from being accidentally pulled, a lock lever is provided. To start the tool, push in the lock lever (in the A direction) and then pull the switch trigger (in the B direction). Release the switch trigger to stop.
For Australia and New Zealand (Fig. 6) Mount the inner flange onto the spindle. Fit the wheel/ disc on the inner flange and screw the lock nut with its protrusion facing downward (facing toward the wheel). To tighten the lock nut, press the shaft lock firmly so that the spindle cannot revolve, then use the lock nut wrench and securely tighten clockwise. To remove the wheel, follow the installation procedure in reverse. (Fig. 7)
For tool with the lock on and lock-off switch To prevent the switch trigger from accidentally pulled, a lock lever is provided. To start the tool, push in the lock lever (in the A direction) and then pull the switch trigger (in the B direction). Release the switch trigger to stop. For continuous operation, push in the lock lever (in the A direction), pull the switch trigger (in the B direction) and then push the lock lever (in the A direction) further in. To stop the tool from the locked position, pull the switch trigger fully (in the B direction), then release it.
Screw the side grip securely on the position of the tool as shown in the figure.

Grinding and sanding operation ALWAYS hold the tool firmly with one hand on rear han- dle and the other on the side handle. Turn the tool on and then apply the wheel or disc to the workpiece. In general, keep the edge of the wheel or disc at an angle of about 15 degrees to the workpiece surface. During the break-in period with a new wheel, do not work the grinder in the B direction or it will cut into the work- piece. Once the edge of the wheel has been rounded off by use, the wheel may be worked in both A and B direc- tion. (Fig. 8)
Mount the inner flange onto the spindle. Fit the wheel/ disc on the inner flange and screw the lock nut onto the spindle.
When installing a diamond wheel or a abrasive cut-off wheel with its 7 mm or more thick wheel body, mount the lock nut with its pilot circular part (protrusion) for wheel bore facing the wheel.
For Australia and New Zealand
Installing or removing abrasive cut-off wheel / diamond wheel (optional accessory) (Fig. 12)
Unplug tool and place it upside down allowing easy access to spindle. Remove any accessories on spindle. Mount wire cup brush onto spindle and tighten with sup- plied wrench. When using brush, avoid applying too much pressure which causes over bending of wires, leading to premature breakage.
The tool and its air vents have to be kept clean. Regularly clean the tool’s air vents or whenever the vents start to become obstructed. (Fig. 13)
Replacing carbon brushes (Fig. 14 & 15) When the resin insulating tip inside the carbon brush is exposed to contact the commutator, it will automatically shut off the motor. When this occurs, both carbon brushes should be replaced. Keep the carbon brushes clean and free to slip in the holders. Both carbon brushes should be replaced at the same time. Use only identical carbon brushes. Use a screwdriver to remove the brush holder caps. Take out the worn carbon brushes, insert the new ones and secure the brush holder caps.
Unplug tool and place it upside down allowing easy access to spindle. Remove any accessories on spindle. Thread wire wheel brush onto spindle and tighten with the wrenches. When using wire wheel brush, avoid applying too much pressure which causes over bending of wires, leading to premature breakage.
To maintain product SAFETY and RELIABILITY, repairs, any other maintenance or adjustment should be per- formed by Makita Authorized Service Centers, always using Makita replacement parts.
Besitzer und unser Team antworten in der Regel innerhalb eines Tages – und Ihre Frage hilft auch anderen weiter.
Stellen Sie die erste Frage — andere Nutzer oder unser Team antworten Ihnen.