DE
Makita logo
Offizielle Bedienungsanleitung

Makita DST220

44 Seiten·2.1 MB·Sonstiges·PDF·ENFRITNLJA
Makita DST220
Inhaltsverzeichnis 28 Abschnitte RO Maşină de capsat cu acumulator MANUAL DE INSTRUCŢIUNI · SPECIFICATIONS · ENG901-1 · WARNING: · … AnzeigenAusblenden
Page 1 of the Makita DST220 user manual — RO Maşină de capsat cu acumulator MANUAL DE INSTRUCŢIUNI
Seite 1 · Zum Vergrößern klicken
Seite 1
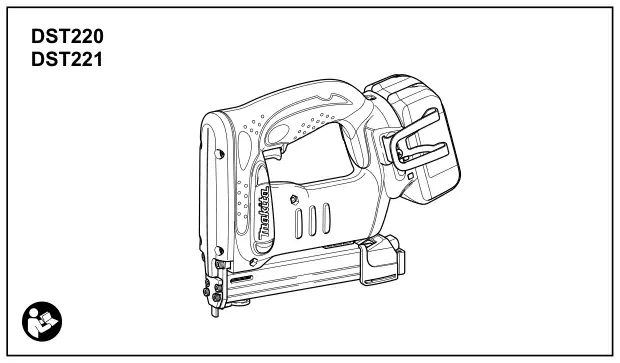
Makita DST220 — RO Maşină de capsat cu acumulator MANUAL DE INSTRUCŢIUNI diagram (page 1)
Abb. 1 · RO Maşină de capsat cu acumulator MANUAL DE INSTRUCŢ…

RO Maşină de capsat cu acumulator MANUAL DE INSTRUCŢIUNI

Makita DST220 — RO Maşină de capsat cu acumulator MANUAL DE INSTRUCŢIUNI diagram (page 1)
Abb. 2 · RO Maşină de capsat cu acumulator MANUAL DE INSTRUCŢ…
Page 2 of the Makita DST220 user manual — 13 014798
Seite 2 · Zum Vergrößern klicken
Seite 2
Makita DST220 — RO Maşină de capsat cu acumulator MANUAL DE INSTRUCŢIUNI diagram (page 2)
Abb. 3 · RO Maşină de capsat cu acumulator MANUAL DE INSTRUCŢ…
Makita DST220 — RO Maşină de capsat cu acumulator MANUAL DE INSTRUCŢIUNI diagram (page 2)
Abb. 4 · RO Maşină de capsat cu acumulator MANUAL DE INSTRUCŢ…
Makita DST220 — RO Maşină de capsat cu acumulator MANUAL DE INSTRUCŢIUNI diagram (page 2)
Abb. 5 · RO Maşină de capsat cu acumulator MANUAL DE INSTRUCŢ…

3 1 014800

2 2 014791

3 014792

Makita DST220 — 3 1 014800 diagram (page 2)
Abb. 6
Makita DST220 — 3 1 014800 diagram (page 2)
Abb. 7
Makita DST220 — 3 1 014800 diagram (page 2)
Abb. 8

4 014793

5 014792

6 014798

Makita DST220 — 4 014793 diagram (page 2)
Abb. 9
Makita DST220 — 4 014793 diagram (page 2)
Abb. 10
Makita DST220 — 4 014793 diagram (page 2)
Abb. 11

2 3 7 014795 8 014794

9 009163

Makita DST220 — 2 3 7 014795 8 014794 diagram (page 2)
Abb. 12
Makita DST220 — 2 3 7 014795 8 014794 diagram (page 2)
Abb. 13
Makita DST220 — 2 3 7 014795 8 014794 diagram (page 2)
Abb. 14

10 014796 11 014797

12 009161

Makita DST220 — 10 014796 11 014797 diagram (page 2)
Abb. 15

13 014798

Page 3 of the Makita DST220 user manual — WARNING:
Seite 3 · Zum Vergrößern klicken
Seite 3

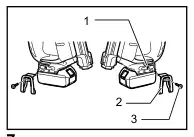
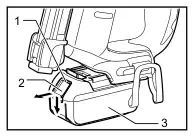
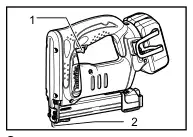
Explanation of general view 1-1. Red indicator 1-2. Button 1-3. Battery cartridge 2-1. Trigger 2-2. Safety lever 3-1. Sub magazine 3-2. Locking lever 4-1. Staples

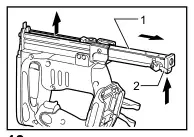
4-2. Main magazine 5-1. Sub magazine 5-2. Locking lever 6-1. Sub magazine 6-2. Locking lever 7-1. Groove 7-2. Hook 7-3. Screw

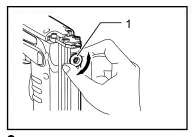
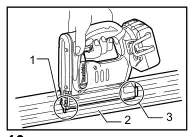
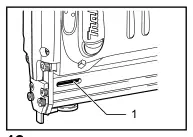
9-1. Nut 10-1. Front 10-2. Workpiece 10-3. Rear 12-1. Sight window 13-1. Sub magazine 13-2. Locking lever

SPECIFICATIONS

ModelDST220DST221 Staple width10 mm10 mm Applicable staples length10 mm - 22 mm10 mm - 22 mm Staple magazine capacity84 pcs84 pcs Overall length247 mm251 mm Net weight2.3 kg2.4 kg Rated voltageD.C. 14.4 VD.C. 18 V
  • Due to our continuing program of research and development, the specifications herein are subject to change without notice.
  • Specifications and battery cartridge may differ from country to country.
  • Weight, with battery cartridge, according to EPTA-Procedure 01/2003

ENE054-1 Intended use The tool is intended for pressing staples into construction materials such as timbers.

  • Be sure to identify safety measures to protect the operator that are based on an estimation of exposure in the actual conditions of use (taking account of all parts of the operating cycle such as the times when the tool is switched off and when it is running idle in addition to the trigger time).

ENG905-1 Noise The typical A-weighted noise level determined according to EN60745:

Sound pressure level (LpA) : 82 dB (A) Sound power level (LWA) : 93 dB (A) Uncertainty (K) : 3 dB (A)

ENH101-15 For European countries only

EC Declaration of Conformity We Makita Corporation as the responsible manufacturer declare that the following Makita machine(s): Designation of Machine: Cordless Stapler Model No./ Type: DST220,DST221 are of series production and Conforms to the following European Directives:

ENG900-1 Vibration The vibration total value (tri-axial vector sum) determined according to EN60745:

Vibration emission (a h )3.5 m/s 2

2006/42/EC And are manufactured in accordance with the following standards or standardised documents:

Uncertainty (K)1.5 m/s 2

ENG901-1

  • The declared vibration emission value has been measured in accordance with the standard test method and may be used for comparing one tool with another.

EN60745 The technical documentation is kept by our authorised representative in Europe who is:

Makita International Europe Ltd. Michigan Drive, Tongwell, Milton Keynes, Bucks MK15 8JD, England

  • The declared vibration emission value may also be used in a preliminary assessment of exposure.

WARNING:

  • The vibration emission during actual use of the power tool can differ from the declared emission value depending on the ways in which the tool is used.

ENGLISH (Original instructions) · Wear ear protection

Page 4 of the Makita DST220 user manual — ENC007-7
Seite 4 · Zum Vergrößern klicken
Seite 4

30.1.2009

10. Make sure no one is nearby before operation. Never attempt to drive fasteners from both the inside and outside of wall at the same time. Fasteners may rip through and/or fly off, presenting a grave danger. 11. Watch your footing and maintain your balance with the tool. Make sure there is no one below when working in high locations. 12. Check walls, ceilings, floors, roofing and the like carefully to avoid possible electrical shock, gas leakage, explosions, etc. caused by stapling into live wires, conduits or gas pipes. 13. Use only fasteners specified in this manual. The use of any other fasteners may cause malfunction of the tool. 14. Do not tamper with the tool or attempt to use it for other than driving fasteners. 15. Do not operate the tool without fasteners. It shortens the service life of the tool. 16. Stop driving operations immediately if you notice something wrong or out of the ordinary with the tool. 17. Never fastener into any materials which may allow the fastener to puncture and fly through as a projectile. 18. Never actuate the switch trigger and safety lever at the same time until you are prepared to fastener workpieces. Allow the workpiece to depress the safety lever. Never defeat its purpose by securing the safety lever back or by depressing it by hand. 19. Never tamper with the safety lever. Check the safety lever frequently for proper operations.

Director Makita Corporation 3-11-8, Sumiyoshi-cho, Anjo, Aichi, 446-8502, JAPAN

GEA010-1

General Power Tool Safety Warnings

GEB075-2

CORDLESS STAPLER SAFETY WARNINGS

1. Always assume that the tool contains fasteners. Careless handling of the stapler can result in unexpected firing of fasteners and personal injury. 2. Do not point the tool towards yourself or anyone nearby. Unexpected triggering will discharge the fastener causing an injury. 3. Do not actuate the tool unless the tool is placed firmly against the workpiece. If the tool is not in contact with the workpiece, the fastener may be deflected away from your target. 4. Disconnect the tool from the power source when the fastener jams in the tool. While removing a jammed fastener, the stapler may be accidentally activated if it is plugged in. 5. Use caution while removing a jammed fastener.

SAVE THESE INSTRUCTIONS.

The mechanism may be under compression and the fastener may be forcefully discharged while attempting to free a jammed condition. 6. Do not use this stapler for fastening electrical cables. It is not designed for electric cable installation and may damage the insulation of electric cables thereby causing electric shock or fire hazards. 7. Always wear safety goggles or safety glasses with side shield, and a full face shield when needed. 8. Keep hands and feet away from the ejection port area. 9. Always remove the battery cartridge before loading the fasteners, adjustment, inspection, maintenance or after operation is over.

ENC007-7

IMPORTANT SAFETY INSTRUCTIONS

FOR BATTERY CARTRIDGE

1. Before using battery cartridge, read all instructions and cautionary markings on (1) battery charger, (2) battery, and (3) product using battery. 2. Do not disassemble battery cartridge. 3. If operating time has become excessively shorter, stop operating immediately. It may result in a risk of overheating, possible burns and even an explosion.

000230 Tomoyasu Kato

Page 5 of the Makita DST220 user manual — Staples
Seite 5 · Zum Vergrößern klicken
Seite 5

4. If electrolyte gets into your eyes, rinse them out with clear water and seek medical attention right away. It may result in loss of your eyesight. 5. Do not short the battery cartridge: (1) Do not touch the terminals with any conductive material. (2) Avoid storing battery cartridge in a container with other metal objects such as nails, coins, etc. (3) Do not expose battery cartridge to water or rain. A battery short can cause a large current flow, overheating, possible burns and even a breakdown. 6. Do not store the tool and battery cartridge in locations where the temperature may reach or exceed 50 ゚C (122 ゚F). 7. Do not incinerate the battery cartridge even if it is severely damaged or is completely worn out. The battery cartridge can explode in a fire. 8. Be careful not to drop or strike battery. 9. Do not use a damaged battery.

FUNCTIONAL DESCRIPTION

CAUTION:

  • Always be sure that the tool is switched off and the battery cartridge is removed before adjusting or checking function on the tool.

Installing or removing battery cartridge

  • Always switch off the tool before installing or removing of the battery cartridge.
  • To remove the battery cartridge, slide it from the tool while sliding the button on the front of the cartridge.
  • To install the battery cartridge, align the tongue on the battery cartridge with the groove in the housing and slip it into place. Always insert it all the way until it locks in place with a little click. If you can see the red indicator on the upper side of the button, it is not locked completely. Install it fully until the red indicator cannot be seen. If not, it may accidentally fall out of the tool, causing injury to you or someone around you.

SAVE THESE INSTRUCTIONS.

  • Do not use force when installing the battery cartridge. If the cartridge does not slide in easily, it is not being inserted correctly.

Tips for maintaining maximum battery life

1. Charge the battery cartridge before completely discharged. Always stop tool operation and charge the battery cartridge when you notice less tool power. 2. Never recharge a fully charged battery cartridge. Overcharging shortens the battery service life. 3. Charge the battery cartridge with room temperature at 10 ゚C - 40 ゚C (50 ゚F - 104 ゚F). Let a hot battery cartridge cool down before charging it. 4. Charge the battery cartridge once in every six months if you do not use it for a long period of time.

Safety system

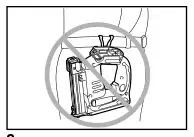
Fig.2 Make sure all safety systems are in working order before operation. The tool must not operate if only the switch trigger is pulled or if only the safety lever is pressed against the wood. It must work only when both actions are performed. Test for possible faulty operation with a tool unloaded and pointed well away from yourself or any bystanders.

NOTE:

  • There is a possibility that the tool may operate for an instant when only the trigger is pulled. This does not indicate a problem. If this occurs, point the tool well away from yourself or any bystanders. Release and pull the trigger again to make sure the safety systems are in working order.

ASSEMBLY

CAUTION:

  • Always make sure that your fingers are not placed on the trigger and the battery cartridge is removed before carrying out any work on the stapler.

Staples

  • Handle the staples and their box carefully. If the staples have been handled roughly, they may be bent out of shape, causing poor staple feed or jamming.
  • Avoid storing the staples in a very humid or hot place or place exposed to direct sunlight.
Page 6 of the Makita DST220 user manual — CAUTION:
Seite 6 · Zum Vergrößern klicken
Seite 6

CAUTION:

OPERATION

  • Do not use staples other than designated in this manual or staples that appear to be damaged, bent, rusty or corroded.

Depth adjustment

Fig.9 If the staples are driven too deep or too shallow, adjust the driving depth by turning the nut on the bottom of the tool. For deeper driving of staples, turn the nut clockwise. For shallower driving, turn the nut counterclockwise. Please note the nut must be turned in increments of 90° (1/4 turn) so that the groove on the nut runs parallel to the magazine.

  • Do not insert staples of which size is different each other at the same time inside the magazine , causing poor staple feed or jamming.

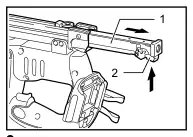
Loading staples Remove the battery cartridge. Press the locking lever on the rear of the sub magazine and slide the sub magazine backward.

Driving staples

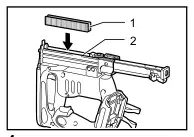
Fig.3 Load staples into the main magazine with their feet facing up. Slide the sub-magazine forward.

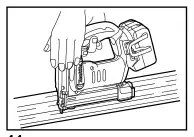
Fig.10 Place flat the opening of the tool from which staples are fired on the material to be fastened and hold the tool firmly against the material. Then pull the lever and then pull the trigger fully to drive the staples. The grip is shaped so that the tool head can be held down securely with index finger and thumb. After driving a staple, be sure to release the trigger fully. When the head of driven staple remains above the surface of material to be fastened, drive the staple while holding the stapler head firmly.

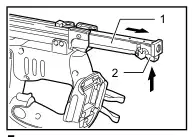
Fig.4 To secure the sub magazine in place, hook the locking lever on the rear of the sub-magazine.

CAUTION:

  • With the magazine loaded, if the tool is held downward and the sub-magazine is opened, the staples can fall out and present a danger to anyone or anything below. Keep this in mind especially when working in high locations.

NOTE:

Unloading staples

  • Using the stapler continuously with the head of driven staples remaining above the surface of material to be fastened may cause damage to the driver of the stapler and stapler jamming etc..

CAUTION:

  • When removing staples, make sure that your fingers are not placed on the trigger or the lever and the battery cartridge is removed from the stapler. Misfiring may cause personal injuries and property damage. Remove the battery cartridge. Press the locking lever and slide the magazine back.

Checking remaining staples

CAUTION:

Fig.5 Take out staples from the magazine slit.

  • Do not operate the tool without staples. It shortens the service life of the tool. There is a convenient sight window on the right side of the tool (when viewing the tool from the front). Use this sight window to check if there are staples in the magazine. When staples are not visible through the window, load staples into the magazine.

Hook

CAUTION:

  • Always make sure that your fingers are not placed on the trigger or the lever and the battery cartridge is removed before using the hook.

Removing jammed staples

WARNING:

  • Always make sure that the trigger are released and the battery cartridge is removed before removing jammed staples . Remove the battery cartridge from the stapler.

CAUTION:

  • Do not hang the hook from the waist belt. Dropping the stapler, which is caused by the hook accidentally coming out of place, may cause misfiring and personal injuries. The hook is convenient for temporarily hanging the tool. This can be installed on either side of the tool. To install the hook, insert it into a groove in the tool housing on either side and then secure it with a screw. To remove, loosen the screw and then take it out.

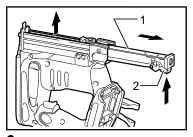
Fig.13 Press the locking lever on the rear of the sub magazine and slide the sub magazine backward. Take out stuck staples that remain inside the opening that staples are fired from as it appears.

Page 7 of the Makita DST220 user manual — NOTE:
Seite 7 · Zum Vergrößern klicken
Seite 7

MAINTENANCE

CAUTION:

  • Always be sure that the tool is switched off and the battery cartridge is removed before attempting to perform inspection or maintenance.
  • Never use gasoline, benzine, thinner, alcohol or the like. Discoloration, deformation or cracks may result. To maintain product SAFETY and RELIABILITY, repairs, any other maintenance or adjustment should be performed by Makita Authorized Service Centers, always using Makita replacement parts.

OPTIONAL ACCESSORIES

CAUTION:

  • These accessories or attachments are recommended for use with your Makita tool specified in this manual. The use of any other accessories or attachments might present a risk of injury to persons. Only use accessory or attachment for its stated purpose. If you need any assistance for more details regarding these accessories, ask your local Makita Service Center.
  • Staples
  • Various type of Makita genuine batteries and chargers
  • Safety goggles

NOTE:

  • Some items in the list may be included in the tool package as standard accessories. They may differ from country to country.

Frage zu Makita DST220 stellen

Besitzer und unser Team antworten in der Regel innerhalb eines Tages – und Ihre Frage hilft auch anderen weiter.

Add your email to get notified when it’s answered — no spam, ever.

0 questions
Noch keine Fragen zu Makita DST220

Stellen Sie die erste Frage — andere Nutzer oder unser Team antworten Ihnen.

Originaldokument

Makita DST220 PDF-Anleitung

44 Seiten·2.1 MB·Sonstiges·PDF
Klicken Sie oben auf eine Seite, um sie hier zu öffnen
Seite 1 / …
100%
Seiten werden geladen…