DE
Makita logo
Offizielle Bedienungsanleitung

Makita DCG140

60 Seiten·1.3 MB·Sonstiges·PDF·ENJA
Makita DCG140
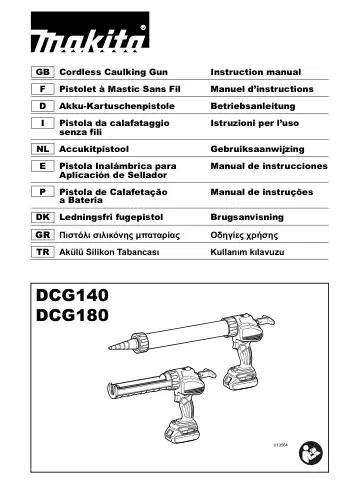
Inhaltsverzeichnis 21 Abschnitte I Pistola da calafataggio Istruzioni per l’uso senza fili · E Pistola Inalámbrica para Manual de instrucciones Aplicación de Sellador · P Pistola de Calafetação Manual de instruções a Bateria · ENGLISH (Original instructions) · … AnzeigenAusblenden
Page 1 of the Makita DCG140 user manual — I Pistola da calafataggio Istruzioni per l’uso senza fili
Seite 1 · Zum Vergrößern klicken
Seite 1
Makita DCG140 — I Pistola da calafataggio Istruzioni per l’uso senza fili diagram (page 1)
Abb. 1 · I Pistola da calafataggio Istruzioni per l’uso senza…

I Pistola da calafataggio Istruzioni per l’uso senza fili

E Pistola Inalámbrica para Manual de instrucciones Aplicación de Sellador

P Pistola de Calafetação Manual de instruções a Bateria
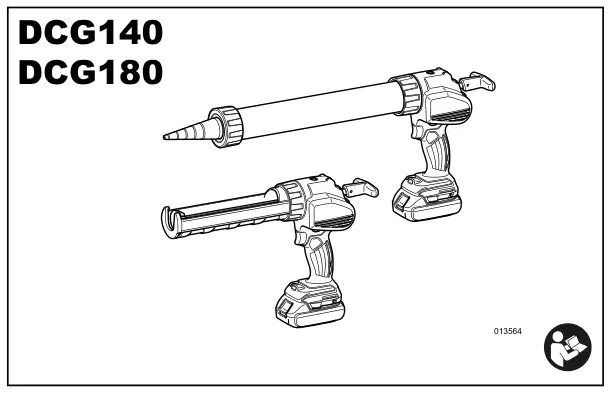
Makita DCG140 — I Pistola da calafataggio Istruzioni per l’uso senza fili diagram (page 1)
Abb. 2 · I Pistola da calafataggio Istruzioni per l’uso senza…
Page 2 of the Makita DCG140 user manual — 7 013610 8 013612
Seite 2 · Zum Vergrößern klicken
Seite 2
Makita DCG140 — I Pistola da calafataggio Istruzioni per l’uso senza fili diagram (page 2)
Abb. 3 · I Pistola da calafataggio Istruzioni per l’uso senza…

1 013558 2 012128

Makita DCG140 — 1 013558 2 012128 diagram (page 2)
Abb. 4

3 013560 4 013557

Makita DCG140 — 3 013560 4 013557 diagram (page 2)
Abb. 5

5 013559 6 013570

Makita DCG140 — 5 013559 6 013570 diagram (page 2)
Abb. 6

7 013610 8 013612

Page 3 of the Makita DCG140 user manual — 15 013571 16 013555
Seite 3 · Zum Vergrößern klicken
Seite 3
Makita DCG140 — I Pistola da calafataggio Istruzioni per l’uso senza fili diagram (page 3)
Abb. 7 · I Pistola da calafataggio Istruzioni per l’uso senza…

9 013611 10 013561

Makita DCG140 — 9 013611 10 013561 diagram (page 3)
Abb. 8

11 013562 12 013566

Makita DCG140 — 11 013562 12 013566 diagram (page 3)
Abb. 9

13 013567 14 013572

Makita DCG140 — 13 013567 14 013572 diagram (page 3)
Abb. 10

15 013571 16 013555

Page 4 of the Makita DCG140 user manual — 17 013569
Seite 4 · Zum Vergrößern klicken
Seite 4

17 013569

Page 5 of the Makita DCG140 user manual — CORDLESS CAULKING GUN SAFETY WARNINGS GEB106-1
Seite 5 · Zum Vergrößern klicken
Seite 5

ENGLISH (Original instructions)

Explanation of general view

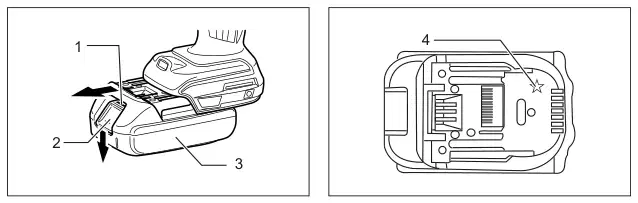
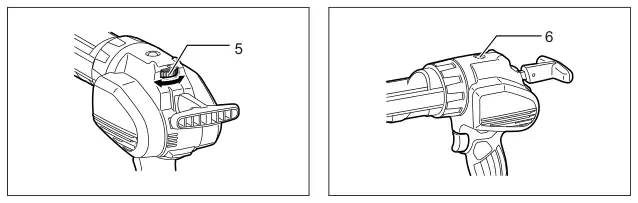
1. Red indicator 2. Button 3. Battery cartridge 4. Star marking 5. Speed adjusting dial
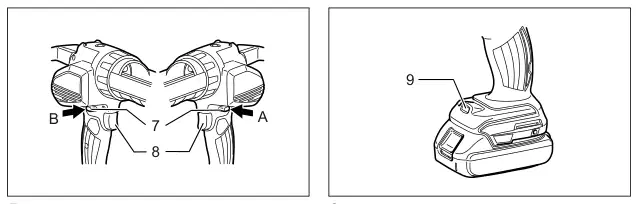
6. Warning lamp 7. Lock lever 8. Switch trigger 9. Lamp 10. Rod handle
11. Holder cap 12. Rubber ring 13. Nozzle

SPECIFICATIONS

ModelDCG140DCG180 Max feed force5,000 N Feed speed0 - 28 mm/s Strokewith short (300 ml) holder214 mm with long (600 ml) holder350 mm Overall lengthwith short (300 ml) holder404 mm with long (600 ml) holder538 mm Standard battery cartridgeBL1415BL1430/ BL1440BL1815/ BL1815NBL1830/ BL1840 Net weightwith short (300 ml) holder2.1 kg2.2 kg2.1 kg2.3 kg with long (600 ml) holder2.5 kg2.6 kg2.5 kg2.7 kg Rated voltageD.C.14.4 VD.C.18 V
  • Due to our continuing program of research and development, the specifications herein are subject to change without notice.
  • Specifications and battery cartridge may differ from country to country.
  • Weight, with battery cartridge, according to EPTA-Procedure 01/2003

Intended use ENE086-1 This tool is intended for applying caulking material to surface.

SAVE THESE INSTRUCTIONS.

General Power Tool Safety Warnings GEA010-1

IMPORTANT SAFETY INSTRUCTIONS ENC007-7

Save all warnings and instructions for future reference.

FOR BATTERY CARTRIDGE

1. Before using battery cartridge, read all instructions and cautionary markings on (1) battery charger, (2) battery, and (3) product using battery. 2. Do not disassemble battery cartridge. 3. If operating time has become excessively shorter, stop operating immediately. It may result in a risk of overheating, possible burns and even an explosion. 4. If electrolyte gets into your eyes, rinse them out with clear water and seek medical attention right away. It may result in loss of your eyesight. 5. Do not short the battery cartridge: (1) Do not touch the terminals with any conductive material. (2) Avoid storing battery cartridge in a container with other metal objects such as nails, coins, etc.

CORDLESS CAULKING GUN SAFETY WARNINGS GEB106-1

1. Keep hands and clothes away from the rod and the plunger area. Otherwise your finger or clothes may be pinched. 2. Always be sure you have a firm footing. 3. Hold the tool firmly. 4. Always work in well ventilated area and wear proper protections in accordance with the operation. 5. Read and follow the manufacture’s instructions on caulking material or adhesive material before usage.
Page 6 of the Makita DCG140 user manual — Switch action
Seite 6 · Zum Vergrößern klicken
Seite 6

(3) Do not expose battery cartridge to water or rain. A battery short can cause a large current flow, overheating, possible burns and even a breakdown. 6. Do not store the tool and battery cartridge in locations where the temperature may reach or exceed 50°C (122°F). 7. Do not incinerate the battery cartridge even if it is severely damaged or is completely worn out. The battery cartridge can explode in a fire. 8. Be careful not to drop or strike battery. 9. Do not use a damaged battery.

Battery protection system The tool is equipped with a battery protection system. This system automatically cuts off power to the motor to extend battery life. The tool will automatically stop during operation if the tool and/or battery are placed under one of the following conditions: • Overloaded:

The tool is operated in a manner that causes it to draw an abnormally high current. In this situation, release the switch trigger on the tool and stop the application that caused the tool to become overloaded. Then pull the switch trigger again to restart. If the tool does not start, the battery is overheated. In this situation, let the battery cool before pulling the switch trigger again. • Low battery voltage:

SAVE THESE INSTRUCTIONS.

Tips for maintaining maximum battery life 1. Charge the battery cartridge before completely discharged. Always stop tool operation and charge the battery cartridge when you notice less tool power. 2. Never recharge a fully charged battery cartridge. Overcharging shortens the battery service life. 3. Charge the battery cartridge with room temperature at 10°C - 40°C (50°F - 104°F). Let a hot battery cartridge cool down before charging it. 4. Charge the battery cartridge once in every six months if you do not use it for a long period of time.

The remaining battery capacity is too low and the tool will not operate. In this situation, remove and recharge the battery.

Speed adjusting dial (Fig. 3) The tool speed can be adjusted by turning the dial. Higher speed is obtained when the dial is turned in the direction of number 5, lower speed is obtained when it is turned in the direction of number 1.

FUNCTIONAL DESCRIPTION

  • NOTE:
  • The speed adjusting dial can be turned only as far as 5 and back to 1. Do not force it past 5 or 1, or the speed adjusting function may no longer work.
  • Depending on the type and condition of caulking material, the rod may get clogged when operating with low speed. In that case set the speed adjusting dial higher.

Installing or removing battery cartridge (Fig. 1)

  • CAUTION:
  • Always switch off the tool before installing or removing of the battery cartridge.
  • Hold the tool and the battery cartridge firmly when installing or removing battery cartridge. Failure to hold the tool and the battery cartridge firmly may cause them to slip off your hands and result in damage to the tool and battery cartridge and a personal injury. To remove the battery cartridge, slide it from the tool while sliding the button on the front of the cartridge. To install the battery cartridge, align the tongue on the battery cartridge with the groove in the housing and slip it into place. Insert it all the way until it locks in place with a little click. If you can see the red indicator on the upper side of the button, it is not locked completely.

Overload warning lamp (Fig. 4) The warning lamp flickers in red when the tool is overloaded. If the load reaches some point, the lamp keeps lighting in red and the tool stops. To restart the tool, release the trigger and pull the trigger again.

Switch action

  • CAUTION:
  • Before inserting the battery cartridge into the tool, always check to see that the switch trigger actuates properly and returns to the “OFF” position when released.
  • When not operating the tool, push the trigger-lock button from A side to lock the switch trigger in the OFF position. (Fig. 5) To prevent the switch trigger from accidentally pulled, the trigger-lock button is provided.
  • CAUTION:
  • Always install the battery cartridge fully until the red indicator cannot be seen. If not, it may accidentally fall out of the tool, causing injury to you or someone around you.
  • Do not install the battery cartridge forcibly. If the cartridge does not slide in easily, it is not being inserted correctly.
Page 7 of the Makita DCG140 user manual — Installing film type pack
Seite 7 · Zum Vergrößern klicken
Seite 7

To start the tool, push the trigger-lock button from B side and pull the switch trigger. Tool speed is increased by increasing pressure on the switch trigger. Release the switch trigger to stop. After use, press in the trigger-lock button from A side.

(600 ml). Use appropriate rod in accordance with holder type. • Always keep the rod and piston clean. Adhering caulk may damage the tool.

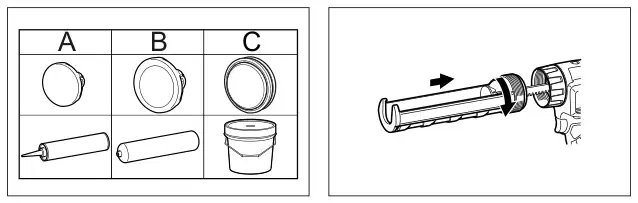
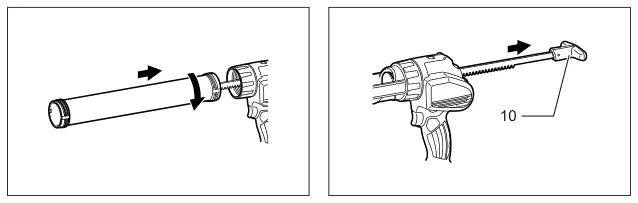
Installing holder (Fig. 10 & 11) Hold the bottom of the holder and the holder joint, then turn the holder clockwise. Tighten it firmly until it stops. Make sure the holder is tightened firmly. Otherwise the tool may be damaged. To remove the holder, turn it counter clockwise.

Lighting up the lamp

  • NOTE:
  • You can rotate the holder in accordance with required situations to facilitate the operation.
  • The short holder (300 ml) is intended for the cartridges only. Use only piston A with short holder (300 ml), and do not use it with film type packs or direct filling. Also use appropriate rod in accordance with the holder type.
  • NOTE:
  • Use a dry cloth to wipe the dirt off the lens of lamp. Be careful not to scratch the lens of lamp, or it may lower the illumination.
  • When the tool is overheated, the lamp flickers. Cool down the tool fully before operating again.

Installing cartridge

Drip preventive function The motor keeps running for a short time even after the trigger is released. It releases the pressure of the caulking material and prevents dripping.

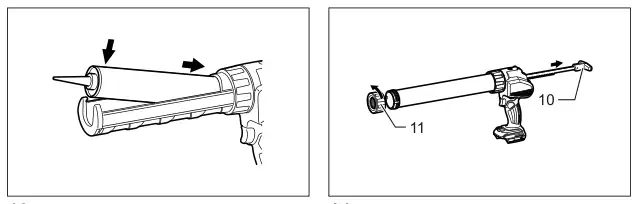
Installing the cartridge into the short holder (300 ml) (Fig. 12) Pull the rod handle backwards slowly until it stops. (Fig. 13) Insert the cartridge into the holder as illustrated. Push the rod gently until the piston touches the bottom of the cartridge. To remove the cartridge, pull the rod backwards until it stops, then lift out the cartridge.

ASSEMBLY

  • CAUTION:
  • Always be sure that the tool is switched off and the battery cartridge is removed before carrying out any work on the tool.
  • Always place the tool on the ground or workbench when carrying out any assembling work. The tool without being held tight may loose balance and cause injury.

Installing the cartridge into the long holder (600 ml) (Fig. 14) Remove the holder cap from the holder. Pull the rod handle backwards slowly until it stops. (Fig. 15) Insert the cartridge into the holder. Attach the holder cap. Make sure it is tightened firmly. Push the rod gently until the piston touches the bottom of the cartridge. To remove the cartridge, remove the holder cap, then take out the cartridge.

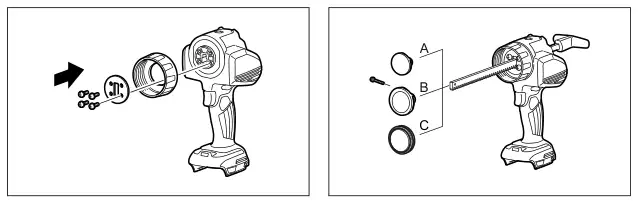
Installing holder joint (Fig. 7) Attach the holder joint firmly along the tool, set the plate, and fix them with screws tightly. To remove the holder joint, follow above procedure in reverse.

  • NOTICE:
  • Always check the cartridge for puncture or damage before installing. Do not use damaged cartridge, otherwise the tool may be damaged.
  • When using a partially used cartridge, remove any adhered material on the cartridge.

Installing rod and piston (Fig. 8 & 9) Insert the rod into the slit of the tool. Attach the piston and tighten it with a screw. To remove the rod and piston, follow the installation procedure in reverse.

Installing film type pack

  • NOTICE:
  • The teeth on the rod must point down.
  • There are three types of pistons. Piston A for cartridges. Piston B for film type packs. Piston C for direct filling.
  • Choose appropriate piston in accordance with the type of caulking material container. Improper piston may cause leakage or tool breakage.
  • There are two types of rods. The short rod for the short holder (300 ml), and the long rod for long holder
  • NOTICE:
  • Make sure the piston B is attached to the rod. Do not use other type of piston for film type pack.
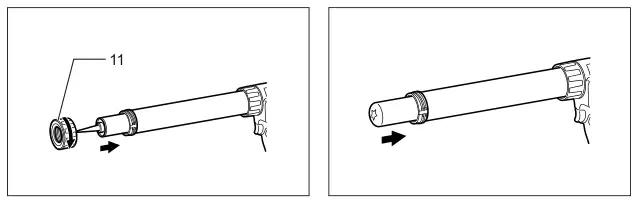
  • Film type pack can be installed in the long holder (600 ml) only. Remove the holder cap, the nozzle and the rubber ring from the holder. Pull the rod handle backwards slowly until it stops. (Fig. 16) Cut off the tip of the film type pack.
Page 8 of the Makita DCG140 user manual — OPERATION
Seite 8 · Zum Vergrößern klicken
Seite 8

Insert the film type pack into the holder. (Fig. 17) Attach the rubber ring, the nozzle and the holder cap. Make sure holder cap is tightened firmly. Push the rod gently until the piston touches the bottom of the film type pack.

  • Nozzle tip is not cut adequately. Cut the nozzle tip suitable for individual operation.
  • Hardened material gets clogged in the nozzle. Remove the hardened material.
  • The cartridge is damaged. Replace the cartridge.
  • Caulking material is stiff. Warm the material until it becomes soft.
  • The wrong piston is used. Use appropriate piston.

MAINTENANCE

Direct filling

  • CAUTION:
  • Always be sure that the tool is switched off and the battery cartridge is removed before attempting to perform inspection or maintenance except for the following troubleshooting related to the light.
  • Never use gasoline, benzine, thinner, alcohol or the like. Discoloration, deformation or cracks may result.
  • Clean the holder and the rod after every day’s work. Keep them free from the adhesive material. Remove the caulking material before it hardens. Remained adhesive material may cause breakage of the tool. To maintain product SAFETY and RELIABILITY, repairs, carbon brush inspection and replacement, any other maintenance or adjustment should be performed by Makita Authorized Service Centers, always using Makita replacement parts.
  • NOTICE:
  • Make sure the piston C is attached to the rod. Do not use other type of piston for direct filling.
  • Direct filling can only be performed with the long holder (600 ml). Remove the holder cap, the nozzle and the rubber ring from the holder. Make sure the rod handle is placed at the most front position. Dip the mouth of the holder into the caulking material. Pull the rod handle slowly until required amount of caulking material is filled in the holder. Attach the rubber ring, the nozzle and the holder cap. Make sure holder cap is tightened firmly.

OPTIONAL ACCESSORIES

  • CAUTION:
  • These accessories or attachments are recommended for use with your Makita tool specified in this manual. The use of any other accessories or attachments might present a risk of injury to persons. Only use accessory or attachment for its stated purpose. If you need any assistance for more details regarding these accessories, ask your local Makita Service Center.
  • Piston A
  • Piston B
  • Piston C
  • Short holder (300 ml) set
  • Long holder (600 ml) set
  • Nozzle
  • Safety goggles
  • Makita genuine battery and charger

OPERATION

  • CAUTION:
  • Do not touch the rod during operation. Otherwise your finger may be pinched between the rod and the housing of the tool.
  • Always wear goggles during operation.
  • NOTICE:
  • Do not cover vents, or it may cause overheating and damage to the tool.
  • If you can not pull out the rod, turn the speed adjusting dial to 1, and pull the switch trigger for a moment, and try to pull the rod out after the motor stopped. If the rod is still clogged, perform the same action until the rod is able to move. Cut off the tip of the nozzle suitable for individual operation. Be careful how much you cut the nozzle. The diameter of the nozzle affects the amount of caulking material dispensed. Pull the trigger to dispense caulking material. The amount of the caulking material dispensed is determined by the trigger, the speed adjusting dial, the diameter of the nozzle opening, caulking material type, and temperature. It is recommended that the speed adjusting dial is set to “1” and pull the trigger slowly at the first time to test how much amount of caulking material is dispensed. When the rod reaches front end, the motor starts idling. Replace the caulking material when it happens.

Noise ENG905-1 The typical A-weighted noise level determined according to EN60745:

Sound pressure level (LpA): 70 dB (A) or less Uncertainty (K): 3 dB (A) The noise level under working may exceed 80 dB (A)

Wear ear protection.

Page 9 of the Makita DCG140 user manual — MAINTENANCE
Seite 9 · Zum Vergrößern klicken
Seite 9

Vibration ENG900-1 The vibration total value (tri-axial vector sum) determined according to EN60745:

Vibration emission (a h )2.5 m/s 2 or less Uncertainty (K): 1.5 m/s 2
  • ENG901-1
  • The declared vibration emission value has been measured in accordance with the standard test method and may be used for comparing one tool with another.
  • The declared vibration emission value may also be used in a preliminary assessment of exposure.
  • WARNING:
  • The vibration emission during actual use of the power tool can differ from the declared emission value depending on the ways in which the tool is used.
  • Be sure to identify safety measures to protect the operator that are based on an estimation of exposure in the actual conditions of use (taking account of all parts of the operating cycle such as the times when the tool is switched off and when it is running idle in addition to the trigger time).

For European countries only ENH101-16 EC Declaration of Conformity We Makita Corporation as the responsible manufacturer declare that the following Makita machine(s): Designation of Machine: Cordless Caulking Gun Model No./ Type: DCG140, DCG180 are of series production and Conforms to the following European Directives:

2006/42/EC And are manufactured in accordance with the following standards or standardised documents:

EN60745 The technical documentation is kept by:

Makita International Europe Ltd. Technical Department, Michigan Drive, Tongwell, Milton Keynes, Bucks MK15 8JD, England

31. 7. 2012

Director Makita Corporation 3-11-8, Sumiyoshi-cho, Anjo, Aichi, 446-8502, JAPAN

Tomoyasu Kato

Frage zu Makita DCG140 stellen

Besitzer und unser Team antworten in der Regel innerhalb eines Tages – und Ihre Frage hilft auch anderen weiter.

Add your email to get notified when it’s answered — no spam, ever.

0 questions
Noch keine Fragen zu Makita DCG140

Stellen Sie die erste Frage — andere Nutzer oder unser Team antworten Ihnen.

Originaldokument

Makita DCG140 PDF-Anleitung

60 Seiten·1.3 MB·Sonstiges·PDF
Klicken Sie oben auf eine Seite, um sie hier zu öffnen
Seite 1 / …
100%
Seiten werden geladen…