



Please read this operation manual carefully for proper operation, and keep
it for future reference.
convenience and protection. These numbers appear on the nameplate located on the bottom of
the product. Please record these numbers in the spaces provided below, and retain this manual
for future reference.
Model No. Serial No.
Hitachi Kokusai Electric Inc.

1. Read Instructions All the safety and operating instructions should be read before the product is operated. 2. Retain Instructions The safety and operating instructions should be retained for future reference. 3. Heed Warnings All warnings on the product and the operating instructions should be adhered to. 4. Follow Instructions All operating and use instructions should be followed. 5. Cleaning Unplug this product from the wall outlet before cleaning. Do not use liquid cleaners or aerosol cleaners. Use a damp cloth for cleaning. 6. Attachments Do not use attachments not recommended by the product manufacturer as they may cause hazards. 7. Water and Moisture Do not use this product near water - for example, near a bath tub, wash bowl, kitchen sink, or laundry tub; in a wet basement; or near a swimming pool; and the like. 8. Accessories Do not place this product on an unstable cart, stand, tripod, bracket, or table. The product may fall, causing serious injury to a child or adult, and serious damage to the product. Use only with a cart, stand, tripod, bracket, or table recommended by the manufacturer, or sold with the product. Any mounting of the product should follow the manufacturer's instructions, and should use a mounting accessory recommended by the manufacturer. 9. Moving A product and cart combination should be moved with care. Quick stops, excessive force, and uneven surfaces may cause the product and cart combination to overturn.
similar surface. This product should not be placed in a built-in installation such as a bookcase or rack unless proper ventilation is provided or the manufacturer's instructions have been adhered to.

11. Power Sources This product should be operated only from the type of power source indicated on the marking label. If you are not sure of the type of power supply to your home, consult your product dealer or local power company. For products intended to operate from battery power, or other sources, refer to the operating instructions. 12. Grounding or Polarization This product is equipped with a three-wire grounding-type plug a plug having a third (grounding) pin. This plug will only fit into a grounding-type power outlet. This is a safety feature. If you are unable to insert the plug into the outlet, contact your electrician to replace your obsolete outlet. Do not defeat the safety purpose of the grounding-type plug. 13. Power-Cord Protection Power-supply cords should be routed to that they are not likely to be walked on or pinched by items placed upon or against them, paying particular attention to cords at plug, convenience receptacles, and the point where they exit from the product. 14. Lightning For added protection for this product during a lightning storm, or when it is left unattended and unused for long periods of time, unplug it from the wall outlet. This will prevent damage to the product due to lightning and power-line surges. 15. Overloading Do not overload wall outlets, extension cords or integral convenience receptacles as this can result in a risk of fire or electric shock. 16. Object and Liquid Entry Never push objects of any kind into this product through openings as they may touch dangerous voltage points or short-out parts that could result in a fire or electric shock. Never spill liquid of any kind on the product. 17. Inflammable and Explosive Substance Avoid using this product where there are gases, and also where there are inflammable and explosive substances in the immediate vicinity. 18. Heavy Shock or Vibration
When carrying this product around, do not subject the product to heavy shock or vibration. 19. Servicing Do not attempt to service this product yourself as opening or removing covers may expose you to dangerous voltage or other hazards. Refer all servicing to qualified
service personnel.

Adjust only those controls that are covered by the operating instructions as an improper adjustment of other controls may result in damage and will often require extensive work by a qualified technician to restore the product to its normal operation. e. If the product has been dropped or damaged in any way. f. When the product exhibits a distinct change in performance-this indicates a need for
service. 21. Replacement Parts When replacement parts are required, be sure the service technician has used replacement parts specified by the manufacturer or have the same characteristics as the original part. Unauthorized substitutions may result in fire, electric shock, or other hazards. 22. Safety Check Upon completion of any service or repairs to this product, ask the service technician to perform safety checks to determine that the product is in proper operating condition. 23. Wall or Ceiling Mounting The product should be mounted to a wall or ceiling only as recommended by the manufacturer. 24. Heat The product should be situated away from heat sources such as radiators, heat registers, stoves, or other products (including amplifiers) that produce heat.

Check when unpacking.
Camera, HV-D30 1 㨯㨯㨯㨯㨯㨯㨯㨯㨯㨯㨯㨯㨯㨯㨯㨯㨯㨯㨯㨯㨯㨯㨯㨯㨯㨯㨯㨯㨯㨯㨯㨯㨯㨯㨯㨯㨯㨯㨯㨯㨯㨯㨯㨯㨯
㨯㨯㨯㨯㨯㨯㨯㨯㨯㨯㨯㨯㨯㨯㨯㨯㨯㨯㨯㨯㨯㨯㨯㨯㨯㨯㨯㨯㨯㨯 㨯㨯㨯㨯㨯㨯㨯㨯㨯㨯㨯㨯㨯㨯㨯㨯㨯㨯㨯㨯㨯㨯㨯㨯㨯㨯㨯㨯㨯㨯㨯㨯㨯㨯㨯㨯㨯㨯㨯㨯㨯㨯㨯㨯 Power plug, R03-P3F (JPR0034*) 1 Operation Manual 1
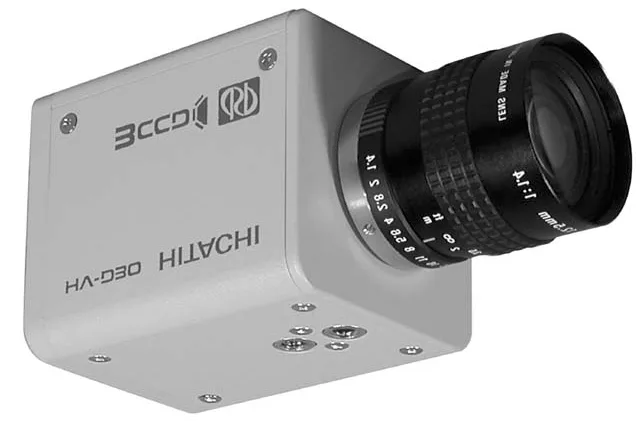
The HV-D30 is a three CCD color camera combining high picture quality and high stability with the convenience of C mount optics. CCD size is 1/3-inch and each is comprised of 410,000 picture elements (470,000 in the PAL version). The circuits from processor to encoder are digitized and contained on a single LSI chip. Hitachi's extensive experience in broadcast and industrial color cameras has lead to an exclusive 14-bit digital processing technology that provides a host of important functions in a newly developed LSI device. The high quality signal processing and image compensating functions were unattainable in earlier analog cameras. The versatile C mount also allows use with a broad range of optical systems and opens up applications in a wide variety of fields.
Single chip LSI camera signal processor ñ
Hitachi's leading edge processing technology (0.18 Ǵm, internal core 1.8V drive, and 3 million gates) is contained on a single newly developed ultra LSI chip. The system is compact and consumes very little power. Also, the 12-bit A/D converter and 14-bit internal processor provide high signal to noise ratio and wide dynamic range.
C mount The camera uses a C mount lens, which is the de facto standard in the industry. A built-in flangeback adjusting mechanism allows use with different types of optical systems. Note : Some lenses cannot be used. Check before use. See page 6 when using lens.
High quality picture Three 1/3-inch 410,000 pixel (470,000 PAL) CCDs with high sensitivity microlenses are mated to prism optics using high precision matching technology. Accelerated digital luminance signal processing is used to deliver a horizontal resolution of 800 TV lines (luminance channel). A new digital noise reduction system provides 64 dB (62 dB PAL) signal to noise ratio.

Clear low noise images are obtained even in high gain mode.
Auto shading compensation (ASC) ñ
Color shading incurred when using a C mount lens is automatically compensated (attenuated). Two modes of shading are provided and can be selected according to the cameras application, a vertical color shading mode or a two-dimensional luminance-shading mode.
ñ Bi-directional data communication
The camera can be connected to a personal computer via RS-232C for two-way data communications to provide finely detailed camera control. An identification (ID) code can be assigned to each camera in a system and allow remotely controlling multiple cameras from a single computer.
Important safety notes ò Use this camera with a 12 VDC power supply. ò Observe that flammable objects, water or metal do not enter the camera interior. These may lead to failure or accident. ò Do not modify the camera or use the camera with external covers removed. These may cause failure, void any warranties and pose a safety hazard. ò Stop using the camera at the approach of an electrical storm (thunder audible). Protect the camera from rain if using it outdoors. ò In event the camera shows any abnormality, switch off the camera and disconnect the power cord. Contact a Hitachi Denshi service representative. Operating considerations ò Power supply
Check that the supplied voltage is between 10.5 and 15 VDC. Inadequate voltage can affect color fidelity and cause noise, while voltage over 15 V can damage the camera. ò Connectors Confirm the power is off before connecting or disconnecting a signal cable. Grasp
connectors by the body, not the attached wires. ò Lens The correct lens is important for deriving optimum performance from the camera. Consult a Hitachi Denshi dealer for a selection of fine lenses according to the application.

ò Installation and storage sites The following types of environment can impair performance, lead to damage, pose safety hazards and shorten the useful life of the camera. Select the sites for installing the storing the camera carefully.
ñ Direct sunlight, rain or snow ñ Flammable or corrosive gasses ñ Very hot or cold (beyond -10 to 45 operating, -20 to 60 storage)
ñ Humid or dusty ñ Exposed to vibration or shock ñ Strong electrical or magnetic fields ñ Exceptionally strong light Continuous operation
In situations where the camera is used continuously for long periods of time, the ambient temperature should be kept below 40 in order to avoid accelerated deterioration of
internal parts and to derive maximum long-term reliability. Cleaning ò A photographer’s blower or lens brush can be used for clearing dust from the lens and optical filters. ò Wipe dust from the case with a soft dry cloth. If soiling is severe, moisten the cloth with a solution of neutral detergent. Afterwards, wipe the cover with a dry cloth. ò Do not use petroleum distillates, alcohol or spray type cleaners. Transportation
Remove the lens (install lens mount cap) and other attachments. Pack the camera carefully in its original or equivalent container. Use ample cushioning to protect the camera from physical shock. CCD properties
The following phenomena are inherent to a charge coupled device imaging element and do
not indicate malfunction. 1) Smear and blooming
Vertical bands are visible when a strong light enters the scene. Adjust the camera aiming direction carefully to avoid strong direct or reflected light. 2) Fixed pattern noise High ambient temperature can cause fixed pattern noise to appear throughout the scene.

3) Moire Interaction between patterns can produce an additional "phantom" pattern to appear. The CCD picture elements (pixels) are arranged in a pattern, which can interact with a pattern in the scene (e.g., a performer wearing a finely striped necktie) to result in a Moire pattern. The effect should be considered when selecting costumes, props and other scene elements. 4) Ghosting Strong direct or reflected light near an object of interest can cause ghosting of the object to appear in the picture. The effect is more obtrusive with certain iris settings and lens types. Select the scene layout and camera pointing direction carefully in order to avoid this effect.

AWB/L button DERECT mode: Holding down this button for more than two seconds carries out auto white balance (AWB). MENU mode: In this mode, it is allowed to change functional data or carry out each function.
MENU button Press this button to display the camera setup menu. The switches U, D, L and R provide different functions depending on whether the menu is displayed (MENU mode) or not (DERECT mode).
U button DERECT mode: While holding down this button for more than two seconds and press the D button carries out auto shading compensation (ASC ASC). MENU MODE: Pressing this button moves
VIDEO conector Outputs a composite video signal(1Vp-75 hms).
䌎䌕
㪬
䌆䌉䌌䌅
㪩 㪣
FILE/R button DERECT mode: Selects the scene file. Press once to show the present file name for 1 second. During the display, press again to change the scene file. MENU mode: In this mode, it is allowed to change functional data or carry out each function.
Pilot lamp Lights when power is supplied.
䌅䌒
䌂䌁䌒
䌁䌗䌂
䌒䌅䌍䌏䌔䌅
㪛
䌍䌕䌌䌔䌉
REMOTE connector Used for connection with the remote control box RC-Z3 or personal computer.
䌌䌅
䌎䌓
䌃
䋭 䌁
䋫
䌂
DC IN connector The 12V power supply is connected.
BAR/D button DERECT mode: Press this button to turn on/off a color bar signal. MENU mode: Pressing this button moves the cursor up.
MULTI connector Output for RGB, Y/R-Y/B-Y, or Y/C and VBS signals. Also used for sync signal I/O and external trigger signal input.
LENS connctor Lens iris control signal connector; connect the iris
For details of each connector, refer to the description of connectors (page 46).

Flang surface of lens
1) Optical characteristics The proper lens is vital for obtaining full performance from the camera. The exit pupil distance is particularly important for a 3 CCD type camera. If too short, vertical color shading can appear in the picture. Also, as the lens iris approaches fully open, problems such as loss of resolution, shading and flare (overall image "white-out") can detract from picture quality. When using in applications that call for open iris, the lenses for 3 CCD are recommended. If another lens is contemplated, check the performance beforehand. 2) Auto iris lens Main types are Video (with self contained iris amplifier) and DC (DC voltage applied to open lens iris) and manual over-ride (e.g., Cosmicar). Lenses without self-contained iris amplifier are not compatible. Camera settings differ according to the auto iris lens type (see page 20).
Association of Japan). Refer to page 47
Lens selection

Fixed focus lens ñ
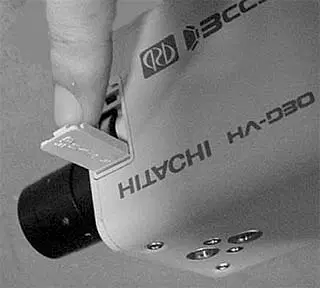
Set the lens focus ring to infinity and pickup an image more than 20 meters distant. While observing the picture, adjust the focus by turning the flangeback ring in the F or N direction.
Zoom lens 1) Set the lens to telephoto and pickup an image more than 3 meters distant. Turn the focus ring to adjust the focus. 2) Set the lens to wide angle and while using care not to disturb the focus ring, turn the flangeback ring to adjust the focus. Repeat the above steps until focus is obtained at both the telephoto and wide angle ends.
NEAR
Video signal type lens adjustment
Adjustment is required after replacing the lens or if using the camera for the first time. 1) Preparation
(1) Release the AGC mode (set the main menu AGC to OFF). (2) If the light source has a flicker component (e.g., fluorescent or mercury lighting),
change the electronic shutter mode (Sub-menu 1 Shutter or Variable) to reduce the flicker. (3) Adjust the white balance.
ñ

LENS TYPE :VIDEO IRIS GAIN : 0 REFERENCE
㪭㫀㪻㪼㫆㩷㫃㪼㫍㪼㫃㩷㫀㫅㪻㫀㪺㪸㫋㫆㫉
H L
(1) Set the lens ALC control fully toward the average (Av ) position. (2) If auto iris hunting occurs, reduce the Iris Gain setting. (3) Adjust the lens level control to where the center circle is positioned at the video
signal level indicator triangle mark.
If the camera video signal detection level is optimum㧘the triangle mark is center. If larger than optimum㧘the triangle marker to the right of H is moved and if lower㧘
the triangle mark to the left of L is moved. 3) Lens adjustment difficult or impossible (1) Video signal level indication unstable
Unstable indication can occur if the light source has 㨍 flicker component 㧔 e. g., fluorescent or mercury lighting㧕, change the electronic shutter mode ( Sub- menu 1
shutter or Variable ) to reduce the flicker. (2) Lens Level control fully at Hi, but auto iris inoperative Reduce the Iris Gain setting. (3) Lens Level control fully at Low, but auto iris inoperative Increase the Iris Gain
setting. (4) Auto iris operates, but scene is dark. Even if lens Level control is adjusted㧘the
triangle mark to the left of the H mark is moved. Boost the gain. Set main menu Gain to 1㧙24 dB in order to raise the sensitivity.
adjustment accuracy. Operate the lens Level control slowly.

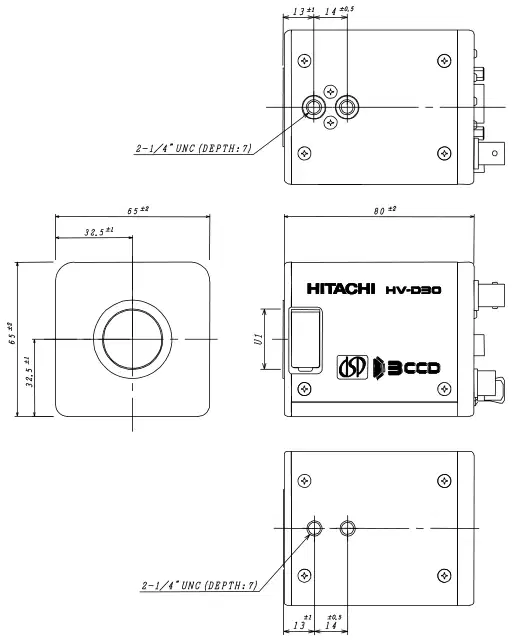
The camera is provided with threaded screw holes at the top and bottom. These allow mounting to either a tripod or a mounting bracket.
Screws longer than 6 mm can cause internal damage, while less than 5 mm prevents secure fastening and risks dropping to cause damage and injury.

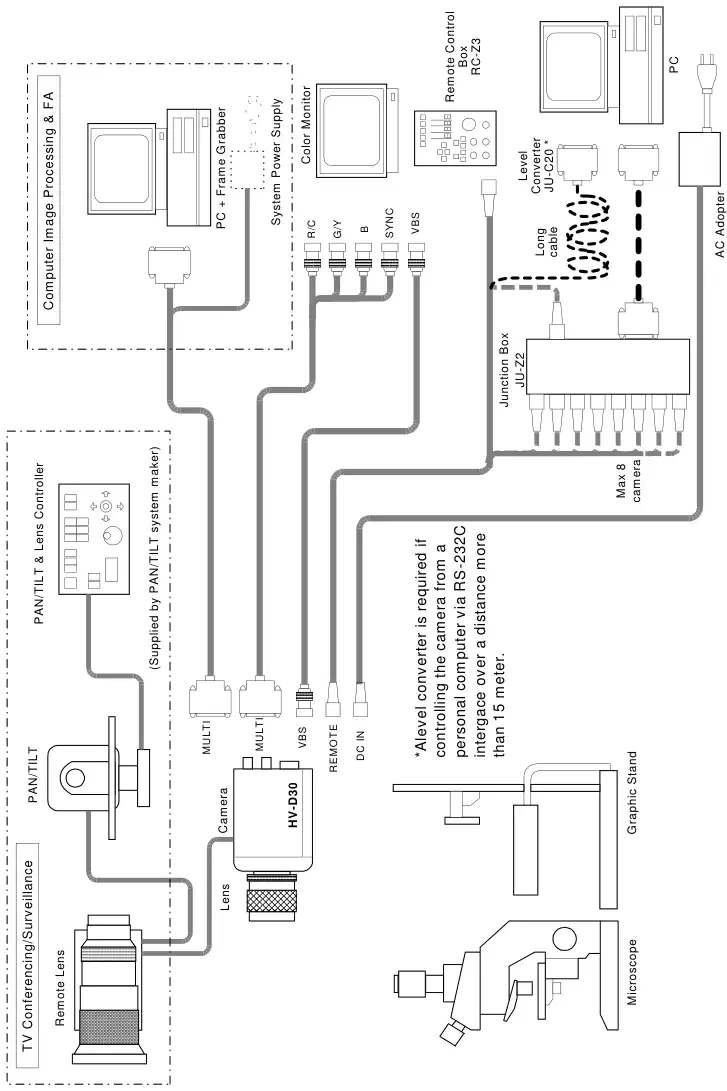
*Alevel converter is required if controlling the camera from a

1. Menu Structure For settings in the camera, the MAIN and SPECIAL menus are available. 1-1 MAIN Menu Structure Press the MENU button and MAIN MENU appears on the screen to indicate the main menu mode. Again press the MENU button to extinguish the menu and enter the direct mode. There are a main function setup menu and three sub-menus, which are arranged hierarchically as shown below. On the MAIN menu, bring the cursor to SUB MENU 1, SUB MENU 2 or ALC and press the R button, and the desired subsidiary menu will come up. To return to the MAIN MENU from the SUB menu 1, SUB menu 2 or ALC, bring the cursor to the top line (title line of SUB MENU 1, SUB MENU 2 or ALC) and press the L button. On each menu screen, bring the cursor to any desired item using the U or D button. For mode change/data setting, use the L or R button.
䂓㪤㪘㪠㪥㩷㪤㪜㪥㪬 䇭 䇭㪚㪘㪤㪜㪩㪘㩷㪤㪦㪛㪜㩷㩷㪑㩷㪤㪘㪥㪬㪘㪣 䇭㪮㪟㪠㪫㪜㩷㪙㪘㪣㪘㪥㪚㪜㪑㩷㪧㪩㪜㪪㪜㪫㩷㪊㪉㪇㪇㪢 䇭㪘㪞㪚㩷㩷㩷㩷㩷㩷㩷㩷㩷㩷㩷㩷㩷㩷㩷㩷㩷㩷㩷㪑㩷㪦㪝㪝 䇭㩷㪞㪘㪠㪥㩷㩷㩷㩷㩷㩷㩷㩷㩷㩷㩷㩷㩷㩷㩷㩷㩷㪑㩷㪇㪻㪙 䇭㪛㪫㪣㩷㩷㩷㩷㩷㩷㩷㩷㩷㩷㩷㩷㩷㩷㩷㩷㩷㩷㩷㩷㪑㩷㪣㪦㪮 䇭㩷㪭㪘㪩㪠㪘㪙㪣㪜㩷㩷㩷㩷㩷㩷㩷㩷㩷㪑㩷㪦㪝㪝 䇭㪪㪬㪙㩷㪤㪜㪥㪬㪈㩷㩷㩷㩷㩷㩷㩷㪑㩷㪄㪕 䇭㪪㪬㪙㩷㪤㪜㪥㪬㪉㩷㩷㩷㩷㩷㩷㩷㪑㩷㪄㪕 䇭㪘㪣㪚㩷㩷㩷㩷㩷㩷㩷㩷㩷㩷㩷㩷㩷㩷㩷㩷㩷㩷㩷㪑㩷㪄㪕 䇭㪝㪠㪣㪜㩷㪪㪜㪣㪜㪚㪫㩷㩷㪑㪝㪠㪣㪜㪄㪈 䇭
䂓㪪㪬㪙㩷㪤㪜㪥㪬㪈 䇭 䇭㪤㪅㩷㪙㪣㪘㪚㪢㩷㩷㩷㩷㩷㩷㩷㩷㩷㩷㪑㩷㪇 䇭㪪㪟㪬㪫㪫㪜㪩㩷㩷㩷㩷㩷㩷㩷㩷㩷㩷㩷㪑㩷㪭㪘㪩㪠㪘㪙㪣㪜 䇭㩷㪭㪘㪩㪠㪘㪙㪣㪜㩷㩷㩷㩷㩷㩷㩷㩷㩷㪑㩷㪈㪆㪍㪇㪅㪊㪏 䇭㪚㪚㪛㩷㪤㪦㪛㪜㩷㩷㩷㩷㩷㩷㩷㩷㩷㪑㩷㪝㪣㪛 䇭㪛㪠㪞㪠㪫㪘㪣㩷㪞㪘㪠㪥㩷㩷㩷㩷㩷㪑㩷㪇㪻㪙 䇭㪛㪅㪥㪅㪩㩷㪤㪦㪛㪜㩷㩷㩷㩷㩷㩷㩷㩷㪑㩷㪦㪝㪝 㩷㩷㪘㪅㪮㪟㪫㩷㪪㪧㪜㪜㪛㩷㩷㩷㩷㩷㪑㩷㪪㪫㪘㪥㪛㪘㪩㪛 䇭㪚㪦㪤㪙㩷㪝㪠㪣㪫㪜㪩㩷㩷㩷㩷㩷㪑㩷㪦㪥 䇭㪝㪠㪣㪜㩷㪪㪜㪣㪜㪚㪫㩷㩷㩷㩷㩷㩷㪑㩷㪝㪠㪣㪜㪄㪈 䇭 䇭 䇭
䂓㪪㪬㪙㩷㪤㪜㪥㪬㪉 䇭 䇭㪛㪰㪥㪘㩷㪚㪟㪩㪦㪤㪘㩷㩷㩷㪑㩷㪦㪝㪝 䇭㪚㪟㪩㪦㪤㪘㩷㪞㪘㪠㪥㩷㩷㩷㩷㪑㩷㪇 㩷㩷㪤㪘㪪㪢㪠㪥㪞㩷㩷㩷㩷㩷㩷㩷㩷㩷㩷㩷㩷㪑㩷㪦㪥 䇭㪞㪘㪤㪤㪘㩷㩷㩷㩷㩷㩷㩷㩷㩷㩷㩷㩷㩷㩷㪑㩷㪦㪥 㩷㩷㪚㪦㪥㪫㪩㪘㪪㪫㩷㩷㩷㩷㩷㩷㩷㩷㩷㪑㩷㪦㪝㪝 䇭㪢㪥㪜㪜㩷㩷㩷㩷㩷㩷㩷㩷㩷㩷㩷㩷㩷㩷㩷㩷㩷㩷㪑㩷㪦㪥 䇭㪪㪟㪘㪛㪠㪥㪞㩷㪤㪦㪛㪜㩷㩷㪑㩷㪣㪬㪤㪠㪥㪘㪥㪚㪜 䇭㪘㪬㪫㪦㩷㪪㪟㪘㪛㪠㪥㪞㩷㩷㩷㪑 䇭㪘㪬㪫㪦㩷㪙㪣㪘㪚㪢㩷㩷㩷㩷㩷㩷㪑 䇭㪝㪠㪣㪜㩷㪪㪜㪣㪜㪚㪫㩷㩷㩷㩷㩷㩷㩷㪑㩷㪝㪠㪣㪜㪄㪈 䇭 䇭
䂓㪘㪣㪚 䇭 䇭㪧㪜㪘㪢㪆㪘㪭㪜㩷㩷㩷㩷㩷㩷㩷㩷㩷㪑㩷㪌㪇㪆㪌㪇 䇭㪦㪭㪜㪩㩷㪩㪠㪛㪜㩷㩷㩷㩷㩷㩷㩷㩷㩷㪑㩷㪇 䇭㪪㪧㪜㪜㪛㩷㩷㩷㩷㩷㩷㩷㩷㩷㩷㩷㩷㩷㩷㩷㩷㪑㩷㪪㪫㪘㪥㪛㪘㪩㪛 䇭㪘㪣㪚㩷㪞㪘㪫㪜㩷㩷㩷㩷㩷㩷㩷㩷㩷㩷㪑㩷㪦㪝㪝 䇭㪘㪣㪚㩷㪞㪘㪫㪜㩷㪪㪜㪣㩷㩷㩷㪑㩷㪧㪩㪜㪪㪜㪫㪈 䇭㪝㪠㪣㪜㩷㪪㪜㪣㪜㪚㪫㩷㩷㩷㩷㩷㩷㪑㩷㪝㪠㪣㪜㪄㪈 䇭

1-2 SPECIAL Menu Structure To select the SPECIAL SET mode, press the MENU button for 2 seconds while holding down the U button. Thus, the SPECIAL SET menu can be displayed. To return to the DIRECT mode, press the MENU button again. The SPECIAL SET menu indicates a list of items, and each special items subsidiary menus are available. These menus are arranged hierarchically as shown below. On the SPECIAL SET menu, most items have '->' mark at the right side. For these items, press the R button, and the relevant item setup menu will come up. To return to the SPECIAL SET menu, bring the cursor to the top line (title line of each subsidiary menu) and press the L button. On each menu screen, bring the cursor to any desired item using the U or D button. For mode change/data setting, use the L or R button.
LENS : -> W HITE GATE : -> 䇭LEVEL : -> MASKING : -> GAMMA : -> DTL : -> 䇭EXT TRIGGER : -> OUTPUT/SYNC: -> FILE SET : -> OTHER FUNC : ->
䂓 W HITE GATE
LENS TYPR : DC 䇭IRIS MODE : AUT0 LENS SELECT : COSMICAR IRIS SPEED : 0 OPEN LIMIT : 127 CLOSE LIMIT :-128
䂓 LEVEL
䂓 MASKING
ENABLE : ON R GAIN : 0 B GAIN : 0 R BLACK : 0 B BLACK : 0
MASKING : ON R HUE: 0 R SAT: 0 Y HUE: 0 Y SAT: 0 G HUE: 0 G SAT: 0 C HUE: 0 C SAT: 0 B HUE: 0 B SAT: 0 M HUE: 0 M SAT: 0
INITIALIZE FILE SEL :FILE-1
䂓 GAMMA(ON)
䂓DTL(ON) 䇭 DTL FREQUENCY: STANDARD 䇭HI CHROMA DTL :OFF 䇭COLOR DTL :OFF AUTO SETPU : 䇭 LEVEL : 䇭0 䇭 PHASE : 0 R-Mg 䇭 W IDTH : 0 䇭INITIALIZE : 䇭FILE SELECT : FILE-1 䇭DTL SUB : ->
䂓DTL SUB(ON) 䇭 LEVEL DEP. : 0 CRISP : 0 H/V BALANCE : 0
INITIALIZE : 䇭 FILE SELECT : FILE-1
䂓 EXT TRIGGER
䂓 OUTPUT/SYNC
䂓 FILE SET
OUTPUT : R,G,B COLOR BAR : OFF MONO : OFF NEGA : OFF SYNC ON G : OFF GL IN : 75ohm GL MODE : VBS SC COARSE : 0㫦 SC FINE : 0 H PHASE : 0
䇭TRIGGER MODE : MODE1 䇭 DELAY TIME : 2H 䇭TRIG POLARITY : POSITIVE 䇭W E POLARITY : POSITIVE 䇭FILE SELECT : FILE-1
FILE SEL : FILE-1 STORE FILE : FILE-2 STORE :PUSH L&R 1SEC STORE PRESET:PUSH L&R 1SEC ALL INITIALIZE:
䂓 ID/TITLE
䂓 DATA SET
䇭NEGA : OFF 䇭FLARE : ON 䇭FLARE LEVEL : 0 䇭KNEE POINT : 0 䇭W HITE CLIP : 0 MESSAGE RTN : ON REMOTE : 9600bps REMOTE TYPE :MODE2 䇭ID/TITLE : -> P.C : ON
1234567890_? ABCDEFGHIJKL MNOPQRSTUVW X YZ()+-*/.,:; DEL INS RET

cam be observed without detailed settings. Asterisk (*) indicates a fixed setting and the cursor jumps to the next item. The Auto indication flashes when a function is related to the auto mode. At the Lens menu, the shutter mode changes according to the Lens Type setting.
MENU Function and Mode WHITE BALANCE : AUTO MAIN MENU AGC : ON
䂓㪤㪘㪠㪥㩷㪤㪜㪥㪬㩷㩷㩷㩷㩷㩷㩷㩷㩷㩷㩷㩷㩷㩷㩷㩷㩷㩷㩷㪘㪬㪫 㪘㪬㪫㪦 䇭 䇭㪚㪘㪤㪜㪩㪘㩷㪤㪦㪛㪜㩷㩷㪑㩷㪘㪬㪫㪦 䇭㪮㪟㪠㪫㪜㩷㪙㪘㪣㪘㪥㪚㪜㩷㪑㩷㪘㪬㪫㪦 䇭㪘㪞㪚㩷㩷㩷㩷㩷㩷㩷㩷㩷㩷㩷㩷㩷㩷㩷㩷㩷㩷㪑㩷㪦㪥 䇭㩷㪞㪘㪠㪥㩷㩷㩷㩷㩷㩷㩷㩷㩷㩷㩷㩷㩷㩷㩷㩷㪑㩷㪂㪉㪇㪻㪙 䇭㪛㪫㪣㩷㩷㩷㩷㩷㩷㩷㩷㩷㩷㩷㩷㩷㩷㩷㩷㩷㩷㪑㩷㪭㪘㪩㪠㪘㪙㪣㪜 䇭㩷㪭㪘㪩㪠㪘㪙㪣㪜㩷㩷㩷㩷㩷㩷㩷㩷㪑㩷㩷㪇 䇭㪪㪬㪙㩷㪤㪜㪥㪬㪈㩷㩷㩷㩷㩷㩷㩷㪑㩷㪄㪕 䇭㪪㪬㪙㩷㪤㪜㪥㪬㪉㩷㩷㩷㩷㩷㩷㩷㪑㩷㪄㪕 䇭㪘㪣㪚㩷㩷㩷㩷㩷㩷㩷㩷㩷㩷㩷㩷㩷㩷㩷㩷㩷㩷㪑㩷㪄㪕 䇭㪝㪠㪣㪜㩷㪪㪜㪣㪜㪚㪫㩷㩷㩷㩷㩷㩷㪑㩷㪝㪠㪣㪜㪄㪈 䇭
LENS TYPE : Not settable SPECIAL SET LENS REFERENCE : Not settable (LENS TYPE: VIDEO) R BLK : Disable SPECIAL SET LEVEL B BLK : Disable
PRST 5600K : The white balance condition is optimized at a color temperature of 5600K. MEM : White balance is automatically adjusted by the direct mode AWB button. AUTO : The white balance condition is set through real time auto white balancing (automatic tracking white balance). The adjustment speed can be selected with A.WHITE SPEED of SUB MENU 1. Note: In the Auto CAM mode, white balance is fixed at AUTO. 3) AGC : AGC ON/OFF ON : Gain is adjusted automatically to compensate for scene brightness. The adjustment range is set by Limit from +6 to +24 dB in 1 dB steps. OFF : Gain is fixed and manually adjustable in 1 dB steps from 0 to +24 dB. 4) DTL㧦DTL level setup LOW : DTL level decrease and a picture becomes soft. NORMAL : DTL level is standard. HIGH : DTL level increase and a picture becomes sharp. VARIABLE : DTL level is VARIABLE value under a line.
ñ

The DTL level can be set to in a range of -128 to 127. The degree of contour correction increases in the positive value setting, and it decreases in the negative value setting. For zero (0) setting, hold down both the L and R buttons for approx. two seconds. However, if setting is OFF, 0 is not set over if the buttons are pressed.
7) ALC : The ALC is brought up. 8) FILE SELECT : Select among scene files 1, 2, 3, 4 and PRESET Camera setting data can be stored in four scene files. To shoot several scenes with different shooting conditions, it is needed to change settings suitable for each scene. To reduce such troublesome operations, various shooting conditions can be memorized previously to scene files, and the conditions most suitable for a scene can be read and set. There is a FILE SELECT item in the following menu. The function, operation are same. It can memory each setting data of the following MENU as the scene file.
MAIN MENU SUB MENU 1 SUB MENU 2 ALC SPECIAL SET LEVEL SPECIAL SET MASKING SPECIAL SET GAMMA SPECIAL SET DTL SPECIAL SET EXT TRIGGER 3. SUB MENU 1
1) M. BLACK : Master black level setting The master black level can be set in a range of -128 to 127. Pressing the R button increases a set value to make the black level higher, and pressing the L button decreases a set value to make the black level lower. For zero (0) setting, hold down both the L and R buttons for approx. one seconds. 2) SHUTTER : Electronic shutter mode OFF : Electronic shutter does not operate. ñ ñ PRESET : Shutter operates at the Preset speed. Select speed from among
1/100 (1/60 PAL), 1/250, 1/500, 1/100, 1/2000, 1/4000, 1/10000, 1/20000, 1/40000 and 1/100000 second.

a) 8 to 1/30 (1/25 : PAL) : Long-time frame store mode 4 to 1/30 (1/25 : PAL) : Long-time field store mode
The camera delivers intermittent video signal output. So, to view continuous images, it is required to use the video memory. A clear image can be attained even if the subject is illuminated with a faint light source. As the store time increases, the degree of after-image becomes higher.
noise, white scratch, etc. of the CCD image sensor will become higher.
When an image of a subject display screen having a different scan frequency is taken, a bright or dark horizontal bar appears to roll up or down the screen. The shutter speed can be adjusted to where the horizontal bars are minimized in the display.
the rolling horizontal bars cannot be stopped. Not settable in the Auto CAM mode. AES : Auto electronic shutter operates in the Limit range setting. Optimum image level is obtained under strong light conditions. Effectively used for special optical systems such as microscope or fixed iris lens which do not have automatic light adjustment functions. Limit settings can be selected from 1/500 to 1/100000 second Note: AES cannot be used with Lens Type Video. To use AES with a manual iris
lens, set the Lens Type to DC and Iris Mode to Manual. If the iris opening is relatively wide in comparison to the DC voltage (manual over-ride lens), set the Lens Type to DC and the Iris Mode to Auto. Note: In the Auto CAM mode and the Lens Type is set to DC, the shutter is set to
AES. If Lens Type is set to Video, default is to off. EXT TRIGGER : External trigger refer to a function for picking up rapidly moving objects by applying a trigger pulse input. It is possible to pick up an image with various timing, by the mode that was set in EXT TRIGGER under 1 line. 3) EXT TRIGGER : external trigger mode For details of MODE1, MODE2, please refer to Page 27.
lag is slightly increased. Suggested for still images. At AES Shutter mode, camera sensitivity is reduced by about 6 dB.

5) DIGITAL GAIN : Digital gain setup Select from among 0, +6 and +12 dB. Since added to the Main menu Gain setting, maximum increase is 36 dB.
intended to reduce disturbance with flashing lights of different color temperatures or moving vehicle headlights. 8) COMB FILTER On: Reduces cross color (rainbow effect) with striped images (e.g., performer

as microscope or inspection devices. FLAT : Equalizes overall image RGB signal levels. Effective for
microscope perimeter shading and inspection devices.
If shading is large or random, compensation error increases. In such cases, adjust for uniform lighting. 8) AUTO SHADING Press R for automatic shading adjustment. See further description on Page 36.
strong light source, e.g., vehicle headlights, enters the scene. STANDARD : Normal setting FAST : Quick response to scene light variations. Use where variations are
sudden, such as when changing a microscope magnification.

auto electronic shutter and ALC.
The detect area cannot be seen in the screen, the ALC control functions for the iris gate. OFF : The overall video signal is detected for ALC control 5) ALC GATE SEL : Select ALC gate pattern Select pattern from among Modes 1, 2, 3, 4, 5 and 6. Use according to scene conditions.
PATTERN3
䇭㪘㪣㪚
䇭 ALC
䇭 ALC
䇭 PEAK/AVERAGE: 18/85 OVER RIDE : 0 SPEED :STANDARD ALC GATE :ON ALC GATE SEL :PATTERN1 FILE SELECT :FILE1
䇭 PEAK/AVERAGE: 18/85 OVER RIDE : 0 SPEED :STANDARD ALC GATE :ON ALC GATE SEL :PATTERN2 FILE SELECT :FILE1
䇭 PEAK/AVERAGE: 18/85 OVER RIDE : 0 SPEED :STANDARD ALC GATE :ON ALC GATE SEL :PATTERN3 FILE SELECT :FILE1
PATTERN4
PATTERN6
䇭 ALC
䇭 ALC
䇭 ALC
䇭 PEAK/AVERAGE: 18/85 OVER RIDE : 0 SPEED :STANDARD ALC GATE :ON ALC GATE SEL :PATTERN4 FILE SELECT :FILE1
䇭 PEAK/AVERAGE: 18/85 OVER RIDE : 0 SPEED :STANDARD ALC GATE :ON ALC GATE SEL :PATTERN5 FILE SELECT :FILE1
䇭 PEAK/AVERAGE: 18/85 OVER RIDE : 0 SPEED :STANDARD ALC GATE :ON ALC GATE SEL :PATTERN6 FILE SELECT :FILE1

Special menu allows more detailed settings for the camera.
Sets positive/negative image switching, communication and other functions.

DC : Iris opens in proportion to a DC control voltage. Also set to DC when not
using an automatic iris.
Video : Lens iris is controlled by the video signal. Note: Auto electronic shutter (AES) cannot be used in the Video mode.
The menu screen changes according to the Lens Type setting.
ع LENS
LENS TYPE :DC
LENS TYPE :VIDEO IRIS GAIN : 0
LENS SELECT :COSMICAR IRIS MODE :AUTO
㪭㫀㪻㪼㫆㩷㫃㪼㫍㪼㫃㩷㫀㫅㪻㫀㪺㪸㫋㫆㫉
DC mode menu VIDEO mode menu 2) IRIS MODE : Sets lens iris mode (Lens Type is DC mode).
Auto : Setting for using auto iris. Note: Be sure to set the Open Limit and Close Limit when using the camera for the
first time or after replacing the lens.
Manual : Setting for manual iris and special optics, e.g., microscope. Note: Be sure to set the Iris Mode when combining AGC and AES. 3) SELECTION : Sets iris control voltage (Lens Type is DC mode).
Cosmicar : Control voltage is 1.5 to 5.5 V (e.g., Cosmicar with manual over-ride).
Set in a range of 1 to 15 where hunting is not produced. Press R to increase and L to decrease the setting. Hold button depressed for continuous change. Simultaneously press R and L for about 2 seconds to set to 8. 5) OPEN Limit : (Lens Type is DC mode.)
Set to where the camera recognizes the iris is fully open. Observe the iris and adjust in the range from Close Limit +1 to 127 to precisely where the iris is fully open. Press R to increase and L to decrease the setting. Press the L and R buttons simultaneously for about 2 seconds to set to 65 for Cosmicar or 127 for Others. Since picture quality deteriorates as the iris approaches fully open, Open Limit can be set to where this does not occur.

previous settings after adjusting. 2) Open Limit needs to be set properly for normal AGC coupled operation. 6) CLOSE Limit : (Lens Type is DC mode.) Observe the iris and adjust to precisely the largest value (smallest diameter). The setting range is from -128 to Close Limit -1. Press R to increase and L to decrease the setting. Press L and R buttons simultaneously for about 2 seconds to set to -85 for Cosmicar or to -65 for Others. Notes:
1. Before this adjustment, set Gain to Normal and Shutter to Off. Return the previous settings after adjusting. 2. Close Limit needs to be set properly for normal AES coupled operation. 7) IRIS GAIN : Iris control voltage gain adjustment (Lens Type is Video mode). Adjustment is required when replacing a Video type lens or if using the camera for the first time. The setting range is from -10 to 10. Press R to increase and L to decrease the setting. Simultaneously press the L and R buttons for about 2 seconds to set to 0. Next adjust the lens Level control to highlight the central marker of the video signal level indicator. Adjust the lens level control to where the circle is positioned at the video signal level indicator triangle mark. Refer to description of video signal type lens adjustment (page 7). If auto iris does not operate even at the Hi or Low extremes of the Level setting, adjust the Iris Gain setting. Notes: Before adjusting Iris Gain, be sure to set the Gain to Normal, High or Max, and
Over-ride to 0. Adjustment is incorrect in the AGC mode. After adjusting, return the previous settings.

Sets the area (window) position for use as white balance control data. Adjust the window to a white or gray monochrome portion of the screen. Setting operation is the same as Iris Gate.
of memory auto white balance, a video signal appearing in the window on screen is detected for white balancing. In the MENU mode, the window is presented over the video signal. For the setting procedure, refer to 'WHITE GATE Menu of SPECIAL SET Menu' (p. 25).
Even under WHITE GATE:ON condition, the window disappears when the cursor is moved to another item. In the DIRECT mode, the window does not appear but white balance control is conducted by the white gate function. OFF : A video signal of the entire image is detected for carrying out white balance
control. The window does not appear.
2) GATE AREA : The window can be shifted up/down. To shift the window up, press the R button. To shift it down, press the L button. 3) GATE AREA : he window can be shifted left/right. To shift the window rightward, press the R button. To shift it leftward, press the L button. 8. LEVEL This menu screen allows you to set up a black level and gain of R/B video signal. 1) R GAIN : R gain level setting
The allowable setting range is -128 to 127.
Pressing the R button increases a numeric value to make the R video signal gain higher. Pressing the L button decreases a numeric value to lower the R video signal
gain. For 0 (zero) setting, hold down both the L and R buttons for approx. two seconds.
The allowable setting range is -128 to 127.
Pressing the R button increases a numeric value to make the B video signal gain higher. Pressing the L button decreases a numeric value to lower the B video signal gain. For 0 (zero) setting, hold down both the L and R buttons for approx. two seconds. 3) R BLK : R black level setting 22

The allowable setting range is -128 to 127.
Pressing the R button increases a numeric value to make the R video signal black level higher. Pressing the L button decreases a numeric value to lower the R video signal black level. For 0 (zero) setting, hold down both the L and R buttons for approx. two seconds. 4) B BLK : B black level setting
The allowable setting range is -128 to 127.
Pressing the R button increases a numeric value to make the B video signal black level higher. Pressing the L button decreases a numeric value to lower the B video signal black level. For 0 (zero) setting, hold down both the L and R buttons for approx. two seconds. Note: In case of CAM MODE: AUTO, numeric values of R BLK, B BLK become
ineffective.
Y
B
C G
to +127. Respectively press the R button to increase and the L button to decrease the vector color hue as indicated in the figure. Each item can be set to 0 by simultaneously pressing the L and R buttons for about 2 seconds.

8) Y SAT: Increase yellow color level 9) G SAT: Increase green color level 10) C SAT: Increase cyan color level 11) B SAT: Increase blue color level 12) M SAT: Increase magenta color level The above items can be set in the range of -32 to +31. Respectively press the R button to increase and the L button to decrease the color level. Each item can be set to 0 by simultaneously pressing the L and R buttons for about 2 seconds.
gamma point. Simultaneously press the L and R buttons for about 2 seconds to set to 0.
gamma point. Simultaneously press the L and R buttons for about 2 seconds to set to 0. 5) Initialize : Returns level menu settings to preset values. Simultaneously press L and R for about 2 seconds.

11. DTL Menu for setting detail parameters 1) DTL FREQ : DTL amplifying frequency changeover. LOW : The lower band frequency is amplified. STANDARD : The standard amplification is performed.
carried out.
phase ranges. Select each color phase setting with CH1 and CH2.
Off : Color detail is disengaged. 4) Auto setup : Color detail phase is detected automatically. Set the marker to the desired phase area and press R for automatic detection (indicates OK when completed). 5) Level : Sets color detail level Range is -128 (soft) to 127 (sharp). Press both L and R for about 2 seconds to set to 0. 6) Phase : Sets color detail phase Present phase is indicated beside the setting values. Since the VBS output is shown as monochrome on the monitor, a monochrome indication can also be used for an
approximate setting. At Auto setup, the automatically detected phase setting is indicated.
monitor. Use a VBS signal for color detail setting.
monitor.Use a VBS signal for color detail setting.

8) Initialize : Returns level menu settings to preset values. Simultaneously press L and R for about 2 seconds.
9) File select : Selects scene files 1 - 4 and preset. 10) DTL SUB : Change to DTL SUB menu. 12. DTL SUB 1) LEVEL DEP : Dependent level setting Detail amount, and noise, can be reduced in scene dark components. Setting range is -128 to +127. Press the R button to increase the value, reduce the detail amount and expand the video signal level range. Press L button to decrease the value and reduce the range. Set to 0 by simultaneously pressing the L and R buttons for about 2 seconds. 2) CRISP : Crispness level setting Reduces noise when DTL setting is in the range of -128 to 127. However, at high settings, some loss of sharpness occurs in detailed scene components. Setting range is -128 to +127. Press the R button to increase the value and the detail noise. Press the L button to decrease the value and reduce detail noise. Set to 0 by simultaneously pressing the L and R buttons for about 2 seconds. 3) H/V BALANCE : Balance setting for horizontal and vertical detail amount Setting range is -128 to +127. Press the R button to increase the value and reduce the H DTL amount. Press the L button to decrease the value and reduce the V DTL amount. Set to 0 by simultaneously pressing the L and R buttons for about 2 seconds.
L and R for about 2 seconds.

13. Ext trigger The external trigger function is used with a frame grabber to obtain an image of an object at a desired exposure time. Settings can provide images at various timings. The exposure time can be controlled by the external trigger pulse width.
Mode 1: Use for exposure time less than 2 fields.
Mode 2: Use for exposure time greater than 2 fields.
The trigger and CCD mode timing can be combined to obtain image timing as indicated in the figures. a) MODE: MODE1, CCD MODE: FLD
more than 64㱘s
more than 2 fields
EVEN ODD
EVEN ODD
SYNC reset SYNC reset
W E pulse output

more than 64㱘s
External trigger pulse Strobe timing
more than 2 fields
EVEN ODD
EVEN ODD
SYNC reset SYNC reset
W E pulse output
more than 2 fields
more than 2 fields
EVEN ODD Video signal output
EVEN ODD EVEN ODD EVEN ODD EVEN ODD ODD
SYNC reset SYNC reset
W E pulse output
more than 2 fields
more than 2 fields
EVEN ODD Video signal output
EVEN ODD EVEN ODD EVEN ODD EVEN ODD ODD
SYNC res SYNC reset
W E pulse pulse

R, G, B㧦The R, G and B video signals are output to the D-SUB connector.
Y, R-Y, B-Y㧦The Y, R-Y and B-Y signals are output to the D-SUB connector.
Y/C㧦The Y/C and VBS signal is output to the D-SUB connector. 2) COLOR BAR : Color bars ON/OFF 3) MONO : Monochrome (black and white) ON/OFF for the video output signal from the VIDEO connector Set to ON for monochrome. Setting ineffective during color bar. 4) Sync/HD out : Selects sync signal output from the rear panel multi connector. 5) SYNC ON G : G video signal synchronization ON/OFF (In the R/G/B mode only) When output is RGB with Sync on and G on, Sync is added to the G video signal. 6) GL IN : Impedance changeover of input to the GL IN connector.
HIGH : The high impedance level is provided.
75ǡ : An impedance of 75 ohms is provided. Note: When power to the camera is turned off, the high impedance level is provided.
So, do not use this function in a system where power is turned off for the camera unit only.
synchronizing signal.
HD/VD : The HD/VD signal is input as an external synchronizing signal.
B-Y, R-Y output signals. Although VBS and Y/C output signals are also produced, these cannot be used as normal output signals.

The allowable setting range is -128 to 127.
There is no direct relationship between a numeric value and a degree of phase. If the relevant range is exceeded, the SC COARSE setting is updated automatically to permit continuous adjustment. 10) H.PHASE : Adjustment of horizontal synchronization phase The allowable setting range is -128 to 127. 15. File set Use for transferring scene file data to another file or setting all data to preset values. 1) FILE SELECT : Selects scene file 1 - 4 or preset for copy data. 2) STORE FILE : Selects file for storing scene file data. 3) STORE : Press L and R for more than 1 second to transfer selected scene file data to store file. 4) STORE PRESET : Press L and R for more than 1 second to initialize selected scene file data to preset values. 5) All INITIALIZE : Press L and R for more than 1 second to initialize all scene file data to preset values.
both L and R for about 2 seconds to set to 0. Normally set to where gradation appears above 100% video level.
L and R for about 2 seconds to set to 0. Normally set for clip at about 110% video level. Adjust when there is excess video level from the equipment interface.

is displayed.
is not displayed.
(e.g., HV-C20 series).
MODE 2: Normal setting. Use for the RC-Z3 remote control box. 8) ID/TITLE : Change to ID/TITLE menu 9) Pixel correct : White flaw compensation on/off Normally set to on. When image processing equipment is used, since the data of 1 pixel are not precise, the off setting might provide better results in such cases.
17. ID/TITLE ID and title display position and data setting menu. 1) ID : ID display position setting Once an ID is assigned, it becomes possible to control a particular camera unit remotely from a personal computer according to its ID. That is, multiple camera units can be remote-controlled individually from one persona computer. At this function item, specify whether the ID is displayed on screen or not. In case that the ID is displayed on screen, specify its display position also.
of screen.
corner of screen. 2) At this function item, specify whether the TITLE is displayed on screen or not. In case that the TITLE is displayed on screen, specify its display position also.
BOTTOM ID
OFF : Not displayed.
TOP : Displayed at the upper left corner of screen.
ID/TITLE Display Position

BOTTOM : Displayed at the lower left corner of screen. 3) DATA SET : The DATA SET screen comes up. ID : Enter an ID code consisting of three characters.
Alphanumeric upper-case characters and a space character are permitted.
TITLE : Enter a TITLE consisting of up to 12 characters.
Alphanumeric upper-case characters, special symbols and a space character are permitted. Note: The symbol " " in the data represents a space character. On the actual screen, a space character is given as a blank in an ID code or TITLE.
i) With the cursor located at DATA SET, press the D button. The cursor moves to the ID data set position an the first character flashes. ii) Using the L, R, U and D buttons, select an input character. iii) Press the SET UP button, and the selected character will be entered. (The cursor
will then move to the next character position.) iv) In the same manner, repeat the above steps ii) and iii) to enter an ID code and
TITLE. v) On completion of character input, bring the cursor to RET using the L, R, U or D
button. Then, press the SET UP button. The cursor is returned to DATA SET. vi) To quit the SPECIAL SET mode, press the SET UP button.
: Flashing shifts one character toward the right. DEL : Flashing character is deleted, and the subsequent character string is shifted
character string is shifted right.
RET : The cursor is returned to DATA SET.
· ·

Adjust black balance to provide proper color tone at a dark part of video image. In the following cases, be sure to carry out black balance adjustment.
When using the camera first after purchasing it. ñ
When using the camera after it has been unused for a long time. When the camera operating environment is changed (e.g., when the ambient temperature varies significantly). Under normal condition, it is not required to make black balance adjustment at power- on. 1. In the menu mode, carry out automatic black balance adjustment. At the end of successful adjustment AUTO BLACK:OK appears. Notes: 1) Where the lens having the auto iris function is used, the iris is closed
automatically during adjustment. 2) In combinational use with the manual iris lens or microscope, a full-black screen image is provided from the CCD image sensor during adjustment. When picturing after adjustment, a white screen image appears momentarily. This phenomenon is not a symptom of trouble, however. 3) In case that the manual iris lens is used, do not attempt auto black balance adjustment while taking an image of subject having extremely high luminance such as the sun. This may deteriorate black balance accuracy.
Error message Procedure AUTO BLACK㧦BAR Turn off the color bar. AUTO BLACK㧦NG
Close the lens iris. Avoid taking an image of subject having high luminance
such as the sun, or decrease illumination on the microscope. Carry out AUTO BLACK again. If this message appears
in repeated attempts, it is necessary to inspect the inside of the camera. In this case, notify your local Hitachi Denshi sales agent or Hitachi Denshi service office

Carry out white balance adjustment when the illumination condition (color temperature) is changed. Adjust the white balance when using the camera for the first time or after replacing the lens. 1. In the MENU mode, set up WHITE BAL: MEM. 2. Turn off the MENU screen to select the DIRECT mode. 3. Provide a proper aperture value of lens using the auto iris function or manually. 4. Put an white object in the subject image, and zoom it up. 5. Hold the AWB button pressed for about 2 seconds for automatic white balance adjustment. With MESSAGE RTN:ON, AUTO WHITE appears. At the end of successful adjustment AUTO WHITE:OK appears. 6. If white balance adjustment cannot be made, any of the following messages will appear. Take a proper procedure according to the error message, and then try white balance adjustment again.
AUTO WHITE㧦NG CHANGE TO CAM TRY AGAIN
Turn off the color bar.
AUTO WHITE㧦NG CHANGE TO MEMORY MODE TRY AGAIN
Set up WHITE BAL:MEM.
White balance cannot be made due to insufficient
illumination. Increase the intensity of illumination, turn lens iris
toward open direction, or increase the gain to provide a proper video level. Press the AWB switch again. AUTO WHITE㧦NG HIGH LIGHT TRY AGAIN
White balance cannot be made due to excess
illumination. Increase the intensity of illumination, turn lens iris
toward closed direction, or increase the gain to provide a proper video level. Press the AWB switch again. AUTO WHITE㧦NG C.TEMP HIGH TRY AGAIN
The color temperature is too high, making it impossible
to reach the optimum value in adjustment. (If there is no problem in practical application, use the camera under the current condition.) Add a filter to the lens or illumination to decrease the
color temperature.

The color temperature is too low, making it impossible
to reach the optimum value. (If there is no problem in practical application, use the camera under the current condition.) Add a filter to the lens or illumination to increase the
color temperature. AUTO WHITE㧦NG LONG SHUTTER MODE CHANGE SHUTTER MODE TRY AGAIN
Release the long shutter mode.
Set camera mode to manual.
35

The camera detects a white part in the image by itself, and its internal microcomputer automatically adjusts white balance in realtime. Use this function in case that the color temperature varies with time (e.g., from morning to day to night). 1. In the MENU mode, set up WHITE BAL:AUTO. Where the camera is mounted fixedly and the orientation and image-taking range of the camera remain unchanged. it is advisable to use the white gate function in combination for attaining higher accuracy in white balance. 1. In the MENU mode, set up WHITE GATE:ON. 2. Using the WHITE GATE menu in the MENU mode, bring the display window to a monochrome part (white or gray part) in the image. For details of the WHITE GATE function, refer to p. 22. Be sure to set the WHITE GATE window to a white or gray part in the image. Do not set it to a colored part. Auto Shading Correction
Color shading may occur in the vertical direction on screen due to any characteristic of lens. This camera is equipped with a function for correcting color shading automatically. 1. Provide a proper aperture value of lens using the auto iris function or manually. 2. Take an white image fully on screen. At this step, take care so that uneven brightness will not occur in the vertical direction. 3. In the DIRECT mode, press the AWB button. White balance is adjusted automatically. 4. In the DIRECT mode, while holding down this button for more than two seconds and press the D button or in the MENU mode, carry out AUTO SHADING. Thus, color shading in the image is corrected automatically. Notes 1) When using the camera for the first time or after replacing the lens, just be
sure above instructions. 2) If adjusted under a light source that has a flicker component, such as fluorescent or mercury, the white balance accuracy can be impaired. Change the electronic shutter mode (Sub-menu 1 Shutter or Variable) setting to reduce flicker before engaging the auto white balance adjustment.
· Realtime Auto White · 36

In combination of GAIN:AGC, SHUTTER:AES and AUTO IRIS, the following four kinds of ALC (auto level control) can be performed. This feature ensures stable video signal output according to a wide-range change in illumination. Note㧦 1㧚AES cannot be combined with a Video type lens. 2㧚When not using an auto iris lens, at the Lens menu, set Lens Type to DC and Iris Mode to Manual.
0dB OPEN LIMIT CLOSE LIMIT
AGC range AUTO IRIS range
AGC range AUTO IRIS range (DC type/VIDEO type lens)
AES range AUTO IRIS range
AGC range AES range

In case that illumination on the subject is insufficient, just increasing the gain of the camera may cause an increase in noise, resulting in an unclear image. In such a situation, it is advisable to select the long-time store mode using the external memory. Thereby, the image can be brighter and clearer according to the stored amount of image. This camera is provided with two kinds of image store functions (CCD MODE:FLD/FRM in SUB MENU 1). When one of these image store functions is used, video signal output is delivered from the camera with the timing shown below. Since the degree of after-image increases for a moving subject because of image storing, it is recommended to use the image store function when taking a still picture or scene.
In the field store mode, both the CCD lines A and B are read out simultaneously. After completion of storing, video signal output is made on the next field. Immediately before the field on which video signal output is made, the WE signal is delivered from the D-SUB connector equipped on the rear panel.
CCD line A Even field odd field
CCD line B CCD line A CCD line B
Store charge on CCD line A
@` @a @b @c
Store charge on CCD line B
A` Aa Ab Ac
In the frame store mode, each of the CCD lines A and B is read out individually. Therefore, the vertical resolution is superior. After completion storing, video signal output is made between two fields. Immediately before the field on which video signal output is made, the WE signal is delivered from the D-SUB connector equipped on the rear panel.
CCD line B Even field
CCD line B CCD line A Even field
Store charge on CCD line A
@` @a @b @c
Store charge on CCD line B
A` Aa Ab Ac

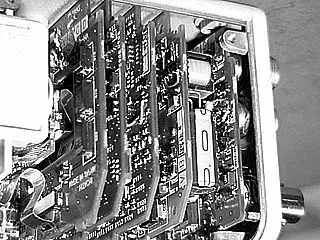
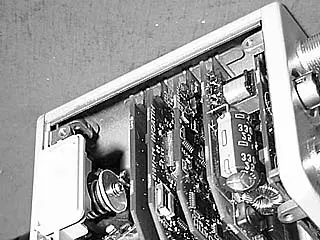
All camera menu items can be operated remotely by connecting the RC-Z3 Remote Control Panel. Connect the panel as follows. (1) Set camera internal switch SW806 to RC-Z3.
See internal switch selection on page 45 . (2) Open the SPECIAL SET menu and set the camera communications rate to 9600 bps
(see page 31, factory setting). Operation (1) Direct control The following items can be controlled directly as well as from the control panel. BAR/CAM ULTRA GAIN(ON/OFF) M.BLK WHITE BAL ENABLE(ON/OFF) A.WHT GAIN R GAIN A.BLK DTL B GAIN SCENTE FILE IRIS MODE R BLK SHUTTE(ON/OFF) B BLK CONTRST(ON/OFF) IRIS (2) MENU controls
All control items are set from menu. Press the FUNCTION button of the remote control panel to produce the menu mode and display the MAIN MENU screen. Again press the FUNCTION button to extinguish the menu screen and return to the direct mode. Operate the menu with the UP, DOWN, LEFT and RIGHT buttons. Note: While pressing the UP button presses the FUNCTION button for 2 seconds to
produce the special set mode. The SPECIAL SET menu appears. (3) Setting data store
Setting data (menu and direct control items) are not automatically stored when using the RC-Z3. Press the RC-Z3 STORE button and the SCENE FILE button of the location for storing the data.
without storing.

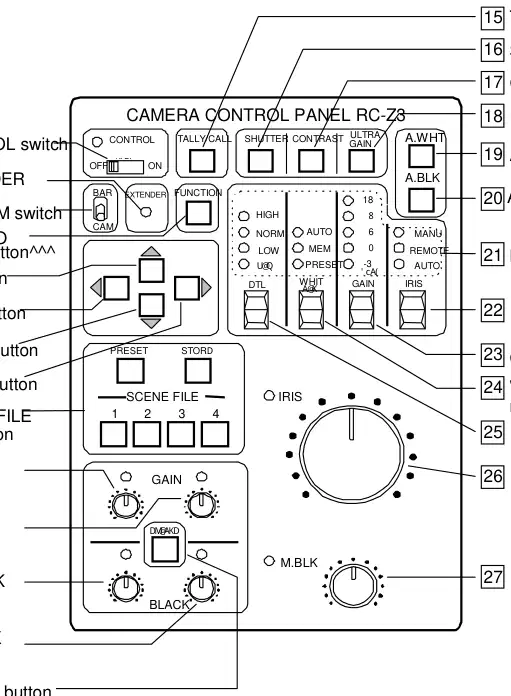
18 ULTRA GAIN button
A.WHT button
A.BLK button
FUNCTIO select button^^^ UP button
WHITE BALANCE mode select switch
M.BLACK Control
CONTROL switch 0
ON (red LED) : Normal camera control from.
except IRIS and M. BLK . Prevents accidental or unauthorized operation.
16 15
and switches. EXTENDER LED 1 This Extender LED is always extinguished using with the HV-D30 camera. BAR/CAM switch 2
Selects the camera output signal. BAR: Color bar signal output

FUNCTION select button Camera setting menu display button. [5 UP, LEFT, DOWN and RIGHT buttons
7 6 5 4
Menu screen operating buttons. SCENE FILE buttons
Select camera application files and stores scene file data. Four application files can be used as scene files. Scene files: To shoot several scenes with different shooting conditions, it is needed to change settings suitable for each scene. To reduce such troublesome operations, various shooting conditions can be memorized previously to scene files, and the conditions most suitable for a scene can be read and set. The RC-Z3 is provided with four files, and four differnt shooting conditions can be memorized. (1) File selection Press the following buttons to change the camera and RC-Z3 settings. PRESET: Produces the standard setting mode SCENE FILE 1: FILE-1 (scene file 1) setting mode SCENE FILE 2: FILE-2 setting mode SCENE FILE 3: FILE-3 setting mode SCENE FILE 4: FILE-4 setting mode
file data are changed. Flashing continues if the data are changed or the original value is returned. When again pressed, the button lights steadily. (2) Setting data store
The Store function is used to save the application file item data. The common file item data are saved during adjustment and operation. Store operation
After entering the settings with the menu screen and RC-Z3, press the STORE
button (the STORE button flashes). Then press the desired SCENE FILE button for storing the settings (STORE button extinguishes). Store release
While the STORE button is flashing, again press the button. The STORE button
extinguishes and the mode is released. File data copy
Press the Preset or SCENE FILE button of the source, then press the STORE
button (flashes). Next press the SCENE FILE button of the destination file. The settings are copied and stored in the designated file. Store operation notes: : 1. After adjustment and operation with the RC-Z3, neglecting the Store operation before pressing a file button loses the adjustment and setting item data. The output is the designated file data prior to adjustment and operation.
3 · 8

0 R GAIN and B GAIN control 0/ Red and blue video signal gain can be adjusted. Press the ENABLE button (lights) to allow adjusting.
Adjustment is coarse when the WHITE BALANCE mode select switch is set to Preset and fine when set to Memory.
R BLACK and B BLACK control
01 02 03
Red and blue video signal black level can be adjusted. Press the ENABLE button (lights) to allow adjusting.
ON : Button lights to indicate R & B gain and R & B black adjustments are effective.
OFF: Adjustments are ineffective when the ENABLE button is extinguished.
TALLY/CALL button lights when pressed. However, function is ineffective in the
HV-D30 camera. SHUTTER button
Shutter on/off; lights when on.
Contrast on/off; lights when on.
Ultra gain on/off. However, function is ineffective in the HV-D30 camera.
A WHT button
balance (button lights). The resulting data are stored in application file memory.

A.BLK button
Direct mode: Press A.BLK to conduct automatic black balance (button lights).
Mode indicator LEDs 10
Indicate status of switches below LEDs. IRIS switch 11
Sets lens iris mode. Press the switch upward to set the mode in the sequence AUTOçREMOTEçMANUAL.
MANUAL: Set the lens A/M switch to M and adjust the lens iris ring manually.
the HV-D30 camera. GAIN switch 12 Sets the camera sensitivity. Press the switch upward to select the sensitivity in the sequence 0ç3ç6ç9ç12ç15ç18ç21ç24 dB. The sensitivity setting is indicated by the combined GAIN LED indication. Note: When CAM MODE AUTO or AGC ON,the -3dB GAIN LED indicated all the time. WHITE BALANCE mode select switch 13
The white balance mode can be selected in the sequence PRESET ç MEM çAUTO.
between 3200 K and 5600 K in the menu mode at W. PRST MODE of the MAIN MENU screen.
MEM : Press the A.WHT button for automatic white balance adjustment.
Select between 3200 K and 5600 K in the menu mode at W. MEM MODE of the MAIN MENU screen.
AUTO : White balance is automatically adjusted in real time (ATW) When the RC-Z3 white balance mode is set to MEM and AUTO, at the MAIN MENU, W. MEM MODE is indicated and at PRESET, W.PRST MODE is indicated.
Selection from the RC-Z3 select switch is ineffective.
DTL switch 14
Camera detail setting. Press the switch to select in the sequence VARIABLEçLOWçNORMALçHIGH. During VAR, the mode indicator LEDs show the detail amount; in the menu mode, the MAIN MENU screen DTL setting is OFF or VAR. IRIS control
Adjusts the lens iris as follows.
AUTO : OVER-RIDE (fine adjustment about ê2 F-stops) can be adjusted REMOTE: Adjustable in the range from fully open to fully closed MANUAL: Iris is not adjustable from the RC-Z3 (adjust by manually turning the

lens iris ring). M. BLK control
Adjusts the master black level
· 16 ·

SW806
RC-Z3
SW401
IN
45

MULTI connector (DMSH-15S) REMOTE connector (HR10A-7R-4S)
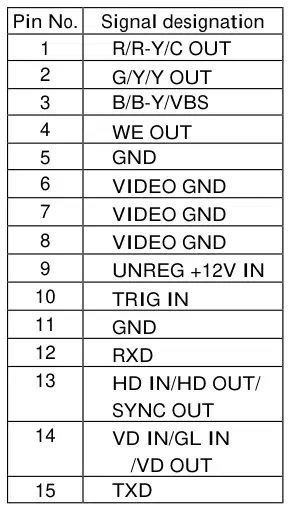
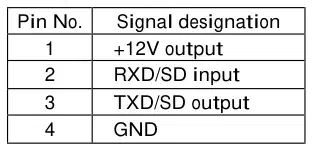
Pin No. Signal designation Pin No. Signal designation 1 R/R-Y/C OUT 1 +12V output 2 G/Y/Y OUT 2 RXD/SD input 3 B/B-Y/VBS 3 TXD/SD output 4 WE OUT 4 GND 5 GND 6 VIDEO GND Plug: HR10A-7P-4P 7 VIDEO GND 8 VIDEO GND 9 UNREG +12V IN 10 TRIG IN 11 GND 12 RXD 13 HD IN/HD OUT/ SYNC OUT
㧖Use M2.6 plug retaining screws.
· Cover JK-C151C · 46

LENS connector (D4-151N-100) DC IN connector (R03-R3M2)
Pin No. Signal designation Pin No. Signal designation 1 +12V A GND 2 NC B +12V input 3 Control C NC 4 GND
B
47

1) Color system NTSC, PAL 2) Optical system 1/3-inch, F2.2 prism 3) Imaging system R, G, B 3 CCD 4) Picture elements Corresponding to 1/3-inch interline transfer CCD (with microlenses) Total pixels NTSC 811 (H) ∂ 508 (V) PAL 795 (H) ∂ 596 (V) Effective pixels NTSC 768 (H) ∂ 494 (V) PAL 752 (H) ∂ 582 (V) Effective image area NTSC 4.88 (H) ∂ 3.66 (V) mm PAL 4.89 (H) ∂ 3.64(V) mm 5) Scanning system 2:1 interlace 6) Scanning frequency NTSC 15.735 kHz (H) ∂ 59.94 Hz (V) PAL 15.634 kHz (H) ∂ 50.00 Hz (V) 7) Encoder system R-Y/B-Y 8) Sync system Internal/external
(VBS, BBS or HD/VD auto selection, when internal input/output switch is input position) 9) Horizontal resolution 800 TV lines, luminance signal center (Y out and DTL off) 10) S/N NTSC 64 dB type (DNR on), 61 dB type (DNR off) PAL 62 dB type (DNR on), 59 dB type (DNR off) (Y out, ǫ=1, DTL off, GAIN 0 dB) 11) Standard sensitivity 2000 lx, F9.5 12) Minimum illumination 0.9 lx (50 IRE, F2.2, GAIN +24 dB, DIGITAL GAIN +12 dB) 13) Gamma correction 0.45/1.0 (on/off) 14) Geometric distortion Full screen 0% (not including lens characteristics) 15) Registration Full screen 0.05% (not including lens characteristics) 16) Vertical contour compensation 2H 17) Lens mount C mount (flangeback 17.25 mm in air) 18) Sensitivity selection AGC (0 to +24 dB) or GAIN (0 to +24 dB step1dB or step 3 dB on remote control menu) 19) Detail control DTL level and frequency 20) Scene files 4 Files 21) Digital gain +6 dB, +12 dB sensitivity increase
by digital signal processing
· · 48

22) CCD drive functions Preset: 1/100 (1/60 PAL), 1/250, 1/500, 1/1000, 1/2000, 1/4000, 1/10,000 1/20,000 1/40,000 1/100,000second Lockscan: NTSC 1/60.38 to 1/2039 second (step 1H), to 1/100,000 second (step approx. 10% video level) PAL 1/50.31 to 1/2024 second (step 1H) to 1/100,000 second (step approx. 10% video level) AES: Off to approx. 1/100,000 second Long term integration: Field/frame integration selectable NTSC 1/30 to approx. 8 seconds (1 frame steps) PAL 1/25 to approx. 8 seconds (1 frame steps) (external image memory needed for continuous image) Frame readout improves vertical resolution (residual image response deterioration) 23) Color bar NTSC: SMPTE, PAL: Full 24) Power supply voltage 12 V rated (Stable operation at 10.5 to 15 VDC (ripple and noise absent)) 25) Power consumption Approx. 4.5 W 26) Dimensions 65 (W) ∂ 65 (H) ∂ 80 (D) mm 27) Mass Approx. 400 g (not including lens) 28) Ambient temperature Operating -10 to 45 Storage -20 to 60
49

(sync 0.3 ê0.1 Vp-p, burst 0.3 ê0.1 Vp-p) 㨯 HD/VD 2 to 5 Vp-p, negative (D-sub connector) Note: Genlock input and Sync output are selected by internal input/output switch. 2) External trigger input (MULTI connector) Ext Trig Low 0 VDC, High 2 to 5 VDC 3) Serial data (REMOTE connector) 1.5 Vp-p ê3 dB/High (when connected to RC-Z3, JU-C20, JU-Z2) RS-232C level (when connected to personal computer) Note: Set internal switches according to connected equipment.
A level converter JU-C20 is required if controlling the camera from a personal computer via RS-232C interface over a distance more than approx.15 meter. 2. Output signal ratings 1) Component video output (VIDEO, MULTI connector) VBS 1.0 Vp-p/75㱅 2) Y/C output (MULTI connector) Y: 1.0 Vp-p/75ǡ C: NTSC 0.286 Vp-p (burst)/75ǡ PAL 0.3 Vp-p (burst)/75ǡ 3) Component output (MULTI connector) Y : 1.0 Vp-p/75ǡ R-Y: 0.7 Vp-p/75ǡ B-Y: 0.7 Vp-p/75ǡ 4) RGB output (MULTI connector) R: 0.7 Vp-p/75ǡ G: 0.7 Vp-p/75ǡ B: 0.7 Vp-p/75ǡ Note: YC/VBS, component and RGB MULTI connector outputs are selected by
menu. 5) Sync outputs (MULTI connector) HD: 2 Vp-p/75ǡ VD: 2 Vp-p/75ǡ Sync: 2 Vp-p/75ǡ Note: Genlock input and Sync output are selected by internal input/output
switch.
· 50

51

Camera control box, RC-Z3 Camera Junction box, JU-Z2 RS-232C level converter JU-C20
㪬
㪘㪪㪚
䌆䌉䌌䌅
㪩 㪣
䌐䌏䌗䌅䌒
䌁䌗䌂
䌂䌁䌒
㪛
䌒䌅䌍䌏䌔䌅 䌍䌕䌌䌔䌉
䌄䌃䇭䌉䌎 䌌䌅䌎䌓
䌃
䋭 䌁
䋫
䌂
In dieser Anleitung genannte Seiten – Hersteller, Support und Downloads.
Besitzer und unser Team antworten in der Regel innerhalb eines Tages – und Ihre Frage hilft auch anderen weiter.
Stellen Sie die erste Frage — andere Nutzer oder unser Team antworten Ihnen.